Sanyo M9990 Belt Change advice appreciated

Status
Not open for further replies.

thinkchronicity

Member (SA)
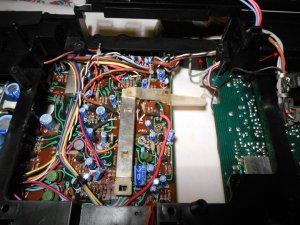
I've been putting off this job for a couple of years as I practised on easier gear, but now I have two of these BBs to do. I've read all the helpful previous posts on this subject and viewed some videos I could find - which were mainly M9994 based. A few hours in and I'm stumped, apart from solving the 3-way tethering issue by desoldering the tape heads....no please!
So I got the chassis out, desoldered the tuner plate wire, desoldered the black wire to the motor (looked to have no slack in it), got the clock out the way, cut two cable ties - one on the purple/grey wire set, LH side of deck, and one just behind the RWD button - unscrewed the black GND wire to the flywheel post, and for good measure unscrewed 6 bolts holding the main audio PCB (was going to switch tactics and approach the belts from the rear, but the PCB's not budging so far).
The problem boils down to the wires to the tape heads having no slack that I can see - I will need 2 or 3 inches in order to pull the tape control buttons out of their slot.Those wires go thru a hole and double back on the other side - looks like connected to the inner side of the audio PCB. There may be a cable tie holding them and possibly some slack wire on the audio board side, but it's hard to see.
Can anyone help from here?san9990.jpg?
 

thinkchronicity

Member (SA)
two screws to undo the Head plate it comes off with play and record in tact then you can put it to the side and get the mech out.
Which two do you mean Hopey? I've circled a couple in this pic that look likely.It looks quite complicated to free the plate though. Can you remember what you did? Going through previous posts on this belt change I see Superlew did it by removing the main PCB and going in from the back to change the belts (seems impossible to me cos of tethering), and Superduper gave details about removing the mech from the front, but didn't mention removing the heads, which seems odd. I wonder if the different variations of this model are slightly different inside.
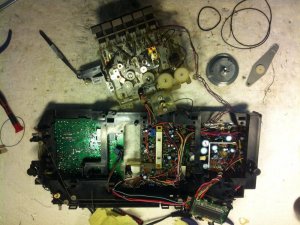
I found a pic (no.2) san9990 001e.JPGSanyoexamplerepair.jpegfrom one guy who removed from the front, but he had to remove the heads using their 4 mount/azimuth screws - what a pain. That's the only way I'm sure would work at the moment.
The one upside of all this tethering is everyhting's hard wired, which may account for much of the amazing sound quality.
 

Superduper

Moderator
Staff member
I've done this many times, but the last was probably a decade ago. One thing for certain is that I've never removed the heads. It's true that there's very little slack in the cables, but all you have to do is make some slack. The cables go through the hole, find them on the other side and solve that. I don't even think you'll have to disconnect anything. If memory serves, you probably just snip a couple of cable ties and feed some wire through -- enough to allow removal of deck. Then flip over and lay on top of a towel to protect it as you are probably going to service the belts while the deck is tethered and laying on the chassis. I can't remember the specifics anymore, but that's how I did it. Again, I've done this many times. Not one time did I undo the heads.
 
  • Like
Reactions: thinkchronicity

thinkchronicity

Member (SA)
Not one time did I undo the heads.
Thanks, that's pretty definitive. It seems there are options here. I would imagine replacing cut cable ties is important to stop things rattling at high volume. I was wrong about the unit's wires being hard wired: they're wire wrapped terminals or whatever you call that method.
 

Superduper

Moderator
Staff member
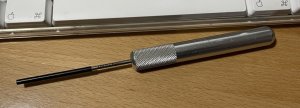
Wire wrapping is fairly common. It's easy to do with the right tool. Shown here is a manual wire wrapper. There are electric ones too but really overkill unless you are doing 500 at a time. I have one, don't know where it is anymore, and it never gets used. The bad part is that wire wrappers are specific to wire gauges, so in order to be able to handle a wide range of possibilities, you need to collect several sizes in your tool arsenal, they are expensive, and they get lost easily. I can't photograph the end of the shaft because the camera won't focus on a tip that small, but there's 2 small holes in the end. One is for the terminal, and the other hole is for the wire. Just spin the tool and the wire is perfectly wrapped.

wire-wrapper.jpg
 

thinkchronicity

Member (SA)
Wire wrapping is fairly common.
This is all new to me. According to Wiki 'the connections are firmer and have less resistance due to cold welding ' So looks like this does play a part in the excellent sound quality. Now I know they're firmer than solder joints I won't be so freaked out to see so many at once. What size tool would I need for this Sanyo I wonder?
 

Superduper

Moderator
Staff member
If I had to guess, I'm going to say either 22 or 24 gauge.

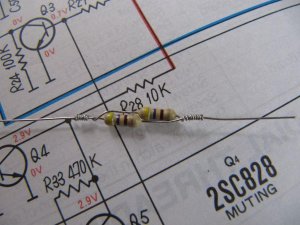
Here is what the wire wrapper can do. I couldn't find the exact resistor I needed in stock for a repair I did for Joe ages ago, so I paralleled a couple resistors to arrive at a value I needed instead of waiting for an order.


RX-5350_b33.jpg
 

thinkchronicity

Member (SA)
If I had to guess, I'm going to say either 22 or 24 gauge.

Here is what the wire wrapper can do. I couldn't find the exact resistor I needed in stock for a repair I did for Joe ages ago, so I paralleled a couple resistors to arrive at a value I needed instead of waiting for an order.
That's a cool looking solution. Thoses tools are pretty expensive - can't justify right now, but would like to try that technique sometime.
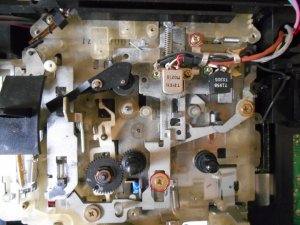
Well, I got the deck out today. My intuition (and eyes) told me I wouldn't have enough slack so I removed the heads reluctantly. I also should have removed the prong that hits the record bar before struggling to pull the mech out - little tip for everyone. As you can see in the pic, the brown wire from the play head would only have an inch of slack to give me if I cut all the ties and pulled, so still not nearly enough to play with.
I've seen a pic of the record bar in situ in this unit and it's smothered in wires snaking around, whereas mine you see here is very clean and accessible. No excess wireage in that area at least. So is there variation inside these models? Wish I knew for sure.san9990 003.jpg
 

thinkchronicity

Member (SA)
I've seen a pic of the record bar in situ in this unit and it's smothered in wires snaking around, whereas mine you see here is very clean and accessible.
Nope, scrub that comment! I rechecked my memory. This job is sending me slightly mad. Even with the mech out now, removing the main board (which I don't need to do touchwood) looks like ..another impossible job.
 

Superduper

Moderator
Staff member
Well, frankly, I don't understand all the issues you are having with the belt change. I've done this task so many times in the past, never had to do any of that. The cables are short because they are bundled up, which is common practice as it's unprofessional to leave loose wires unsecured. The only difference here is that the wires go through the hole which makes it look like they go into a black hole. I'm tempted to open one up and do this again just to refresh my memory, but I don't have one sitting around.
 

thinkchronicity

Member (SA)
I'm tempted to open one up
I'm tempted to send you my other one!
Yeah the black hole needs destroying - I should drill out one side for future missions. You can see the brown wire with the red arrows: almost no slack. So the new belts are in, the heads are back on pretty good (an m300 gauge very handy to have) and just the azimuth to tweak now.
phew...
 

thinkchronicity

Member (SA)
Ok azimuth's done, just one slight issue, speed showing 3090Hz on a 3k tape and no speed adjustment on this model. Hmm...maybe the mains here is a bit hot @247v. No batteries or 12v adapter to try.
 
Status
Not open for further replies.