Help! Can anyone identify the tiny piece that just fell out of my 9494 tape deck?

Status
Not open for further replies.

Ceestarrs

Member (SA)
I'm servicing my tape deck- just attempting to reassemble (first time I've done this, so the going's slow). I was holding it so that the capstan pulley side was facing down and this tiny brass piece fell into my hand. Can't see anywhere obvious that it came from- can anyone help?

The piece
UWdQwVC.jpg


And I'm pretty sure it belongs somewhere amongst this lot

I77H2ze.jpg
 

Ceestarrs

Member (SA)
Do you mean the main capstan flywheel? That lower pic was taken after the piece fell out and you can see the rounded end of the capstan spindle sticking out. Pretty sure there wasn't anything else there and there's no way I can see that this small part could be on there.

I've now removed the flywheel & white plastic assembly in the hope it would be something from or under that, but still can't see anywhere it could've come from. Everything seems to be operating correctly from what I can tell at the moment. Weird.
 

T-STER

Member (SA)
Hmm it looks identical to the central piece of a flywheel i have in a disassembled deck. Well it looks like a pivot of some sort.
 

caution

Member (SA)
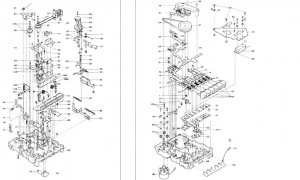
I looked for it on the deck diagram in the service manual for it on hifiengine. I don't see it anywhere.
 

Ceestarrs

Member (SA)
@T-STER: The centre of my flywheel is stainless steel and has a rounded end. The ends of this brass piece are both flat. I agree, looks like a pivot, but as hard as I look, I just can't see where it belongs.

@caution: Wow- thanks! Much appreciated. Really weird that it's not there.


My current plan is to reassemble without it and see if everything operates correctly. If so, I tape it somewhere safe inside the box and forget about it. If It doesn't I've got a good lead on where it's likely to've come from.
 

TW5

Member (SA)
might fit in the nylon bar that holds the flywheel
upside down in to hold the flywheel.
 

BoomboxLover48

Boomus Fidelis
TW5 said:
Thats the number 94 piece ?
top right corner.
That is a Teflon screw above the flywheel cover that adjust the axial clearance of the capstan. We normally adjust that clearance ~1.0 mm.
 

Ceestarrs

Member (SA)
A real mystery! Maybe it had fallen in there from somewhere else and been lodged for years? :shrug:
I'm away at the moment so will continue this over the weekend.
Good to know about the teflon screw adjustment, thanks BBL48. Are there any other adjustments that I should be making while putting this back together?
 

BoomboxLover48

Boomus Fidelis
Ceestarrs said:
A real mystery! Maybe it had fallen in there from somewhere else and been lodged for years? :shrug:
I'm away at the moment so will continue this over the weekend.
Good to know about the teflon screw adjustment, thanks BBL48. Are there any other adjustments that I should be making while putting this back together?
This is the time you can pull the whole flywheel with the capstan and lube the capstan bush bearing. White lithium grease will be fine.
 

Superduper

Moderator
Staff member
It's probably a part of an assembly and broke off, which is why it's not listed separately. Only parts that are available separately are enumerated on exploded views.
 

Ceestarrs

Member (SA)
Found it!

It was the only hole I could see in the mech that didn't seem to have a reason for being there.

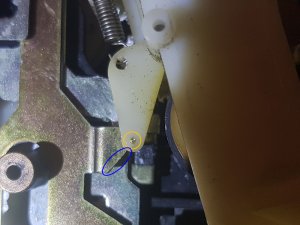
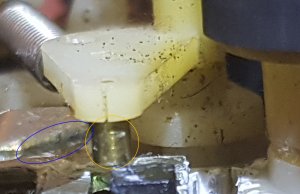
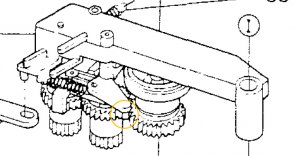
Circled in yellow in the pics. It is shown in the service manual, but not as a separate component and very well hidden!

It is pushed by the sloping lever (circled in blue) & activates the rubber wheel that I think is used for ffw/rwd.

Tape deck's all back together and playing tapes nicely. Just need to do some adjustments. The APLD's not working either (buttons don't stay down). Not investigated fixing that yet.
 

Attachments

  • 2018-03-25-00.15.jpg
    2018-03-25-00.15.jpg
    207.4 KB · Views: 3
  • 2018-03-25-00.14.jpg
    2018-03-25-00.14.jpg
    156.3 KB · Views: 3
  • SM-gears-&-pin.jpg
    SM-gears-&-pin.jpg
    86 KB · Views: 3

BoomboxLover48

Boomus Fidelis
Ceestarrs said:
Found it!

It was the only hole I could see in the mech that didn't seem to have a reason for being there.

Circled in yellow in the pics. It is shown in the service manual, but not as a separate component and very well hidden!

It is pushed by the sloping lever (circled in blue) & activates the rubber wheel that I think is used for ffw/rwd.

Tape deck's all back together and playing tapes nicely. Just need to do some adjustments. The APLD's not working either (buttons don't stay down). Not investigated fixing that yet.
I'm glad you found it!

It is not at all easy to fix those APLD buttons not locking in. It is a small catch on the tip of a lever that locks the button/s in place. The dried up grease all should be washed off, cleaned and lubed to make it work well. I would leave that alone.

~Royce
 

caution

Member (SA)
Nice! I was curious if might have been part of one of that assembly. No reason to break it down if they sell it as a single replacement part number.
I wonder if the nylon contracted over the years and loosened the pressfit, or it's enduring too much lateral force.
 

Superduper

Moderator
Staff member
Ceestarrs said:
..... It is shown in the service manual, but not as a separate component and very well hidden!
Just like I suspected.


caution said:
I wonder if the nylon contracted over the years and loosened the pressfit, or it's enduring too much lateral force.

That same issue is happening to many electronics now. What happens is that the part is nylon and the hole is intended to be an interference fit. Over time, the nylon shrinks which causes it to split on the area of stress (interference fit). The split makes the hole lose it's grip. Eventually, the nylon might crumble. Probably the most famous example is on the Sony CRF-320/330 shortwave radios. 3 of the gears are like this but develops exactly this split, which causes the pressed pin to lose it's grip and spin. In short, the tuning knobs no longer moves the dials. These are expensive radios and collectors had been buying very expensive brass replacements, then overpriced china reproductions (over $100 a set of gears you would expect to cost about $0.50c to manufacture). The prices on those same parts (by competing vendors) now have dropped to the $30's I see.

In this case, I'm not sure how critical that part is but if it's just a locator pin and won't fall out on it's own, might continue to function for years just placed back in there like that.
 

Ceestarrs

Member (SA)
Superduper said:
That same issue is happening to many electronics now. What happens is that the part is nylon and the hole is intended to be an interference fit. Over time, the nylon shrinks which causes it to split on the area of stress (interference fit). The split makes the hole lose it's grip. Eventually, the nylon might crumble. Probably the most famous example is on the Sony CRF-320/330 shortwave radios. 3 of the gears are like this but develops exactly this split, which causes the pressed pin to lose it's grip and spin. In short, the tuning knobs no longer moves the dials. These are expensive radios and collectors had been buying very expensive brass replacements, then overpriced china reproductions (over $100 a set of gears you would expect to cost about $0.50c to manufacture). The prices on those same parts (by competing vendors) now have dropped to the $30's I see.

In this case, I'm not sure how critical that part is but if it's just a locator pin and won't fall out on it's own, might continue to function for years just placed back in there like that.
Yikes, having read your reply, I now see the nylon's cracked just underneath the pin. It seems to be staying in place for now, but do you think it would be wise to glue the crack and the brass into the nylon?
If so, what glue would you recommend?
 

TW5

Member (SA)
Technically there's no glue for nylon
except for some exotic and toxic 2-part system
you can use some glue to stop the pin from falling out
 

Superduper

Moderator
Staff member
You can probably use plastic superglue. It generally comes with a primer marker which you use to treat the surfaces first, then add the superglue. In your case, you merely want to keep the pin from falling out so it should work for awhile, although the best repair will be to remove that nylon piece & create a mold to make a new one, or 3D print one but the amount of work/effort to do either of those, much less successfully extract it out of there will probably not be worth it.
 
Status
Not open for further replies.