"Desperate Dad's" Conion C-100F Restoration

caution

Member (SA)
Mar 25, 2014
2,513
346
83
Boomboxery
Wow that's coming together nicely, you know you're in deep when the bathtub shot shows up :thumbsup:
Can't wait for the next update!
 

Bloodhound

Member (SA)
Nov 5, 2019
95
23
8
While we wait for the repainted case our work goes on. Sadly, my first attempt at refurbishing the tape decks has failed miserably. Upon bench testing I observed the following...

Tape Deck 2... There's a repeating muffle while playing the down facing side. Upside is also muffled terribly but not in a repeating pattern like when switched to side B. The cassette will not eject either. Raises up but doesn't pop out. Seemed to eject fine prior to installation. At a loss as to what's going on.

Tape Deck 1... Rewinds beautifully and automatically trips the rewind button. Fast forward works to but does not automatically cancel. Also doesn't play. It appears as though the left wheel spins tape but right wheel won't turn.As a result the tape is folding up within the cassette. I also noticed the cassette being noticeably lifted on the left side when pressing play. Lost here as well.

On a good note it sounds great on aux. All the switches function beautifully after their deoxit treatment. Not a hint of static or distortion so I'm quite happy there. Looks like it's back to the drawing board with the cassette decks. Onward and upward as they say.
 

Transistorized

Member (SA)
Jun 19, 2012
1,838
266
83
USA
Due to design, it is not uncommon for the upper flat deck to need it's head azimuth adjusted. If you look at the top amp board and the board below it, there are two holes in the circuit boards. They are there so when you are playing a cassette in the upper deck that the head azimuth screw lines up to be adjusted from the top without having to remove it from the chassis. Also, there is a tiny circuit board with a selector switch on the bottom back of the player that is operated by the deck when direction is changed. Its job is to select the correct tracks on the head from one direction to the other. It is often dirty and can disrupt the sound and quality. It is possible to spray deoxit in that selector and work it back and forth to clear that issue up. My guess is (between those two things) that deck should play okay afterwards. Eject can mess up if the zip-tie is missing from the upper part of the cassette caddy. Some folks think this is something that someone added and remove it or it comes up missing because it got brittle and broke off. That can effect eject by not keeping the cassette in the correct position. All of these decks for the most part require a quick HARD press of the eject button to encourage the tape to pop out.

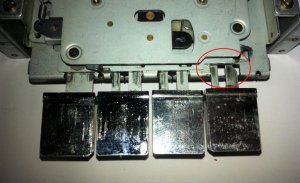
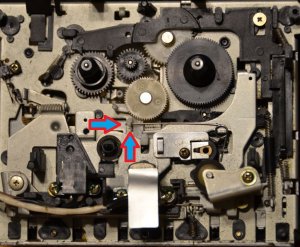
Tape 1: Your situation sounds normal on FF and Rewind if there is no tape in the drive. This deck will auto stop without a cassette on Rewind but not in FF without a tape. It'll keep going because its the take up reel that detects and drives the auto stop feature. However, if while in FF, if you manually stop the take up reel, or a tape is in the drive, it should trip. If not, check the smaller drive belt. It should not be slipping. It should be a SBS 8.9 belt rotating the smaller pulleys. A SBS 9.0 can be used but 8.9 is the correct size. It should not stop nor should any of the smaller pulleys when the tape comes to a stop. The pulley that engages auto stop is the top smaller pulley (2nd picture). Do you have the belt routed correctly? Gray circle represents flywheel pulley and black represents belt path. The flywheel pulley should have a tapered spring underneath it as well.

I think I have a pictures I uploaded here somewhere. There should also be a history post on here about these decks somewhere.

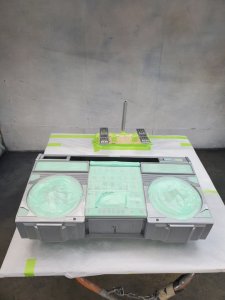
[sharedmedia=core:attachments:8459]
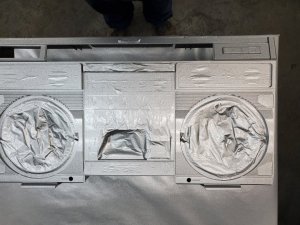
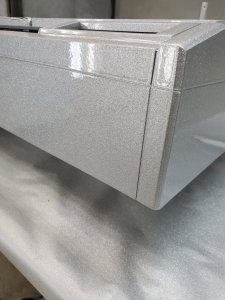
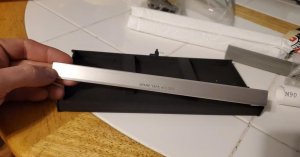
Head adjustment hole for top deck. Small #1 Phillips screw driver for adjustment during playback

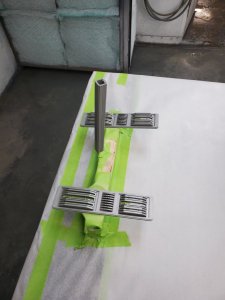
[sharedmedia=core:attachments:42978]
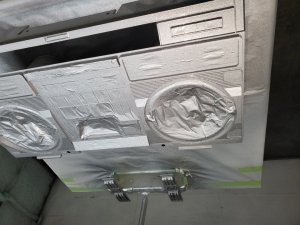
The above pulley runs the auto stop feature
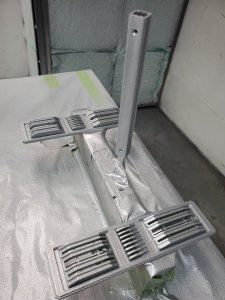
[sharedmedia=core:attachments:39333]
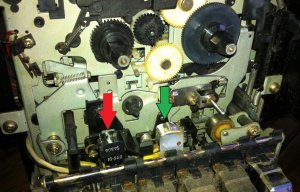
The above picture show components responsible for playback. The cog gear and the plastic arm. Their screws should not be working loose.
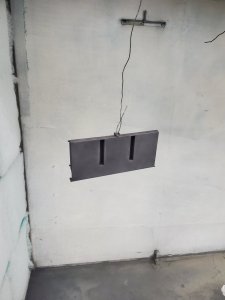
[sharedmedia=core:attachments:38754]
Last picture above is the position of the lower slide rail. Proper alignment when the tape player is in stop position (red circles). The green circle is for the stop solenoid. The plunger groove should be placed on this lever and move freely.
 

Bloodhound

Member (SA)
Nov 5, 2019
95
23
8
Thanks for the help Transistorized! I'll be sure and try everything you've recommended. Adjusting the head azimuth on the upper deck will be tough for me as I have no idea how to do it, what to do or what specialized tools are needed. Being a newbie at this sucks!
 

Bloodhound

Member (SA)
Nov 5, 2019
95
23
8
I'm happy to report we're making progress! Spent a few hours on the decks today with my son and got one problem solved.

Tape 1... Turns out our problem was one similarly addressed by CAUTION in the past. It relates to the spring that keeps the right reel engaged during playback. The tension on ours was more than sufficient. The problem was lateral play in the wheel itself. We removed the spring and bent the tip that makes contact with the white wheel bracket at 120 degrees. This prevented lateral travel to the left which was causing the wheel to disengage the right reel gear. Works GREAT now and the deck sounds fantastic!

40008200253_63c7b33674_o.jpg

Tape 2... Removed the deck from the chassis and sprayed plenty of deoxit into the circuit board selector switch on the bottom back of the player that is operated by the deck when direction is changed. It helped with the sound quality but the eject function is DOA. It's something mechanical and I've been unable to get it sorted. I'm going to continue to search the forum in the hopes of finding a possible cause. The zip tie on the upper part of the cassette caddy is still there so looks like that's ok. Slamming the eject button does nothing but lock the deck in the upper eject position. It has a death grip on the cassette even when lifted. It just refuses to let go of the tape.

Tomorrow we're going to follow Transistorized advice and see if adjusting the azimuth screw will improve playback quality. Gonna do it "by ear" as this operation is all but unknown to me. If it sounds good then we'll stop adjusting and go from there. I assume it's a phillips head screw. Guess we'll find out tomorrow morning!

Thanks again for the help! :)
 

Bloodhound

Member (SA)
Nov 5, 2019
95
23
8
Meanwhile we're getting ready to lay down some paint! Going with a black base coat and close to original grey color with silver metal flake! Then it's on to clear coating and reassembly provided we can get deck 2 to eject again!

85153101_2554308598147154_2992854514614140928_n.jpg

84632323_483723445851442_4860283986854805504_n.jpg

84703369_836745760118306_6033611392186056704_n.jpg
 

docs

Member (SA)
Jun 26, 2010
2,558
381
83
52
United Kingdom
I don't know the deck intimately but as a general rule you are best trying to find the lever that will eject without using the actual eject button. See visually what the button is connected to and follow that along. Chances are that something has "slipped" or the lever is on a pivot which is gunked up.
I think there are some member who know this deck inside out so could offer exact advice, if not, follow the above and do a little tracing of what connects to what.
 

Transistorized

Member (SA)
Jun 19, 2012
1,838
266
83
USA
Hi bloodhound. Most people who adjust the azimuth screw rotate clock wise/counter clock wise until the sound is as even and crisp as possible. A technician would use an alignment cassette. I always adjust by ear.

It is a phillips head screw for this :-)
 

Bloodhound

Member (SA)
Nov 5, 2019
95
23
8
Thanks Docs and Transistorized! Appreciate the advice.

Got a newb question about Tape 1 Deck. I assume the head marked by the red arrow is the record head and the play head is marked by the green arrow. Does the record head require de-magnetizing or just the play head? Thanks! :)

IMG_3903.JPG
 

BoomboxLover48

Member (SA)
Dec 3, 2010
5,763
275
83
Chicago, IL
Red is the Erase head.
Green is the play/recording head.
  • Power to the deck must be off when you do demagnetizing. If not, it will blow the power amp.
  • Power on the demagnetizer, slowly move in and make contact with head, slowly move the demagnetizer out.
  • Make in contact with the head for 10 seconds minimum and that should be enough.
  • Demagnetize the green play/recording head and the red erase head. Demagnetize capstan also.


~Royce
 

BoomboxLover48

Member (SA)
Dec 3, 2010
5,763
275
83
Chicago, IL
Bloodhound said:
Thanks Royce. Can you point out what/where the capstan is? :huh:
Like Floyd said it is the solid steel pin axle above the rubber (pinch roller). It is the axle of the Aluminum flywheel that makes contact with the tape against pinch roller, in play mode. It will also acquire some magnetism over a period of time from the tape.

~Royce
 

Attachments

Bloodhound

Member (SA)
Nov 5, 2019
95
23
8
Thank you for pointing that out.

Ever make one of those newby mistakes that's so infamous you'll never forget it? I did! :clap:

Turns out the tape 2 deck ejects just fine. Being the newb that I am I failed to recognize that one of the buttons is different. And guess what? It is for a very good reason! LOL

IMG_3904.JPG

IMG_3905.JPG

It's shaped to allow further travel than the rest. I Determined that I had the wrong button on the stop eject lever. It's all good now!

Also adjusted the azimuth and gave the pivot switch the deoxit treatment to the max! I'm happy to report its now singing like Gene Kelly in a f&^%$*& hurricane!

The time has come for us to wrap things up in preparation for the big reveal. Everything works and we're enjoying our victory like masters of the universe. If our euphoria holds up we may just have to stick with this boombox hobby awhile. :) Be a shame to learn so much and not keep these lessons and skills in practice.

Thanks for all the help and advice along the way!
 

Bloodhound

Member (SA)
Nov 5, 2019
95
23
8
Well it's finally painted! Over a year ago we stripped this box down and sent the case out for crack repair etc. He just finished the paint in original silver with metal flake. Once the paint hardens it's on to wet sanding and polishing. Expect it will be on it's way back to us in the next week or so. Then reassembly begins! 155302685_216280586860366_1441567888405229905_n.jpg

155278636_1056659364842864_871670316587400283_n.jpg

154780224_1136420316872999_4782914248762511169_n.jpg

154988704_2961434894179256_903522875798572565_n.jpg

155521493_1084509758717666_7961158091686060274_n.jpg

155226197_904690596954389_1744692069044532779_n.jpg
154789819_427485278532826_9184198967052061141_n.jpg

154595133_3762758903817520_812951608317099451_n.jpg

154630126_498677554853678_3168678620518551381_n.jpg

155209459_281307846697312_3556711913838674066_n.jpg
 
  • Like
Reactions: K dabras