VZ-3000 Side B of record player only playing out of single speaker; 2nd speaker has sound but almost inaudible

Status
Not open for further replies.

akinator

New Member
***Warning - this is my first endeavour with any kind of Electronic music equipment, please excuse the dumb questions***
Hi Folks,
I came across this VZ-3000. I managed to replace the belt. Side A works well. When switching to side B, the audio comes out of one speaker fine and almost inaudibly out of the other. The stylus seems to be tracking fine. I tried switching the stylus (styli? styluses?) and it exhibited the same behaviour. I tried cleaning whatever pots(?) I could see as best I could. If anyone has any guidance to point me in the right direction for next steps, It would be greatly appreciated. I do not know how to check circuit boards - my capabilities are limited to the mechanical dissasembly - assembly, but I'm not scared to learn. It may be possible that this is beyond me, and it's ok to let me know that. Much appreciated.
 

dubout

Member (SA)
It looks like the problem must lie between the cartridge of side B and the amplifier. That is a good start as it hopefully is only a snapped cable?! On my VZ2500 the cables are lead underneath the door and they were all cut off by the door mechanism because they moved there in transport. Follow the cables, wiggle them and maybe you find the faulty spot.
 

akinator

New Member
It looks like the problem must lie between the cartridge of side B and the amplifier. That is a good start as it hopefully is only a snapped cable?! On my VZ2500 the cables are lead underneath the door and they were all cut off by the door mechanism because they moved there in transport. Follow the cables, wiggle them and maybe you find the faulty spot.
Thanks so much. I did an initial visual for loose wires, didn't see any. I'll do a deep dive today and see if I find anything. Is it worth trying to switch the two cartridges to see if the problem is the cartridge itself?
 

dubout

Member (SA)
It wouldn't be the first thing I would do as I never have come across a broken cartridge. But it could be. Maybe switch the wires on the cardridge, for example left and right channel. That way you can find out if it is the cartridge or a problem further down the line.
 

BoomboxLover48

Boomus Fidelis
Thanks so much. I did an initial visual for loose wires, didn't see any. I'll do a deep dive today and see if I find anything. Is it worth trying to switch the two cartridges to see if the problem is the cartridge itself?
Cartridge malfunction could be a possibility. I would try switching it and see if that is the cause for the problem. Be careful! They are so fragile.
 

akinator

New Member
It wouldn't be the first thing I would do as I never have come across a broken cartridge. But it could be. Maybe switch the wires on the cardridge, for example left and right channel. That way you can find out if it is the cartridge or a problem further down the line.
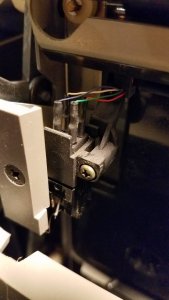
My apologies in advance for the amatuer question, but I'm want to be cautious when switching the wires on the cartridge. There appear to be 4 of them. Do they just pull off?
Cartridge malfunction could be a possibility. I would try switching it and see if that is the cause for the problem. Be careful! They are so fragile.
Thank you. In an abundance of caution I ask the amateur question - do the wires on the cartridge just get pulled off?
 

Attachments

  • 16484889613217247618654262429556.jpg
    16484889613217247618654262429556.jpg
    82.6 KB · Views: 10

BoomboxLover48

Boomus Fidelis
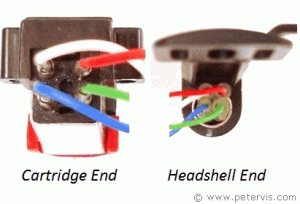
I would trace the wires from the cartridge to the PC board. In most cases it will be a plug in socket. Check if wires are well secured to the plug in socket or broken from the stylus connection to the board. There will be 4 wires with different colors in a sleeve.
 

akinator

New Member
I would trace the wires from the cartridge to the PC board. In most cases it will be a plug in socket. Check if wires are well secured to the plug in socket or broken from the stylus connection to the board. There will be 4 wires with different colors in a sleeve.
Thank you. As you exactly mentioned, and based on my understanding of the service manual, Side B cartridge has 4 wires that go to a socket assembly which on the other side is a plug. It is the left side that is not working which corresponds to Blue and White. The wires seem to trace fine to that socket plug. I can't easily to that plug without removing what I believe is the heat sink. Before I do that I would like to try switching the wires. Do they just pull off or is there some trick to removing them? I fear that any little misstep at this juncture will be ruination and destruction. Once again thank you for taking the time to respond.
 

akinator

New Member
Thank you. As you exactly mentioned, and based on my understanding of the service manual, Side B cartridge has 4 wires that go to a socket assembly which on the other side is a plug. It is the left side that is not working which corresponds to Blue and White. The wires seem to trace fine to that socket plug. I can't easily to that plug without removing what I believe is the heat sink. Before I do that I would like to try switching the wires. Do they just pull off or is there some trick to removing them? I fear that any little misstep at this juncture will be ruination and destruction. Once again thank you for taking the time to respond.
Replying to myself to kinda keep track of what's going on. Pulled off the wires, put the Blue and White on the right side, and am got the same issue (low/crackling) which means the cartridge is good as that side worked fine with the right side wires. Took off heat sink, removed and reset the connector. Seemed to do the trick. Now to put it back together to see if it really worked....
 

akinator

New Member
Cartridge malfunction could be a possibility. I would try switching it and see if that is the cause for the problem. Be careful! They are so fragile.
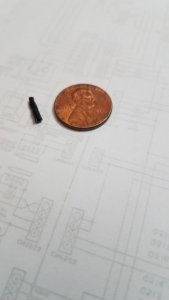
Your recommendation for caution was heeded but not executed. This connector came of one wire leading to a pole terminal. Any ideas if it can be reused? If not any advice in what this is called so I can get a new one?
 

Attachments

  • 16485023534145096944113465349583.jpg
    16485023534145096944113465349583.jpg
    43.7 KB · Views: 12

BoomboxLover48

Boomus Fidelis
Your recommendation for caution was heeded but not executed. This connector came of one wire leading to a pole terminal. Any ideas if it can be reused? If not any advice in what this is called so I can get a new one?
One end can be opened by pry opening the pressed connection to the wire. Remove the wire lead, slide in the the stripped end of the wire and crimp to secure it.
I think you can use the following:


They put a shrink wrap over the female connector so that it won't short with the other leads. That is why it looks black in color. You can use a razor blade and remove the shrink wrap to see better if you want to reuse it.
 
Last edited:

akinator

New Member
One end can be opened by pry opening the pressed connection to the wire. Remove the wire lead, slide in the the stripped end of the wire and crimp to secure it.
I think you can use the following:


They put a shrink wrap over the female connector so that it won't short with the other leads. That is why it looks black in color. You can use a razor blade and remove the shrink wrap to see better if you want to reuse it.
Thank you so much! I understand this is probably electronics 101 - so I really appreciate the rudimentary guidance here. You've probably done this a million times.
 

BoomboxLover48

Boomus Fidelis
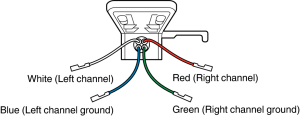
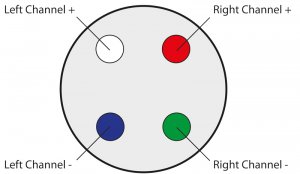
It will be pretty hard to reuse the broken connector piece. I would use the new ones and gently crimp on the wire leads after removing insulation. Take a picture of it before you reconnect so that the color leads are at the right places.

In some cases white wire will be a black wire.
 

Attachments

  • Lead wire color_OBAOILhcyhkefh (1).png
    Lead wire color_OBAOILhcyhkefh (1).png
    75.4 KB · Views: 7
  • Cartridge-Connections.jpg
    Cartridge-Connections.jpg
    53.8 KB · Views: 5
  • headshell-and-cartridge-pinout-view (1).gif
    headshell-and-cartridge-pinout-view (1).gif
    36 KB · Views: 3

akinator

New Member
It will be pretty hard to reuse the broken connector piece. I would use the new ones and gently crimp on the wire leads after removing insulation. Take a picture of it before you reconnect so that the color leads are at the right places.

In some cases white wire will be a black wire.
I removed the shrink and upon close examination, it looks like the wire was soldered to the end of the connector, and not crimped. the wire is so small, I don't think crimping would actually work. So I soldered the wire to the end, slipped the other end over the terminal, and voilla! Side B is now playing out of both left and right sides. I could leave as is, but I most likely need to hunt down shrink that is small enough for that tiny wire - although I'm concerned that I'll rip it off again taking it off the terminal...
 

BoomboxLover48

Boomus Fidelis
I am glad you sorted it out!
VZ 3000 is a very nice unit with like 25Watts per channel.
When you get a chance clean all switches and pots with Deoxit Faderlube 5.
I have the VZ 3500 also and that sounds very good. I was using two Infinity speakers (IL 10- you can buy a pair of those for under $80 now).
You should change the original speakers and replace with newer ones like paradigm, infinity or high end speakers like B&W.

~Royce
 
Last edited:

akinator

New Member
I am glad you sorted it out!
VZ 3000 is a very nice unit with like 25Watts per channel.
When you get a chance clean all switches and pots with Deoxit Faderlube 5.
I have the VZ 3500 also and that sounds very good. I was using two Infinity speakers (IL 10- you can buy a pair of those for under $80 now).
You should change the original speakers and replace with newer ones like paradigm, infinity or high end speakers like B&K.

~Royce
Thanks so much. I will do some cleaning. I have the original speakers - they don't sound too bad but certainly will look into your suggestion. The originals have a certain charm to them. I've still got work to do on the tape deck as it is not behaving, but for now am just going to do some testing of the A->B playing to make sure all is connected properly. I was going to sell this, but I think I'm getting a crush on it. Thank you so much for taking the time to help.
 

dubout

Member (SA)
Congrats on finding and removing the error! Maybe I wouldn't put new shrink on it aand leave it as is.
 

akinator

New Member
Congrats on finding and removing the error! Maybe I wouldn't put new shrink on it aand leave it as is.
Thank you. This is quite a machine - there must be hundreds of parts listed in the service manual. Do you know if this is considered a decent turntable as compared to standalone turntables? My googling is inconclusive on that qualitative evaluation.
Definitely considering leaving as is. If I could figure out a easy way to get it on and off without risk I would try it. There is less than an inch of wire and no real way to take the whole tone arm off (that I can see) without taking apart the whole back again. Trying to avoid that if possible.
 

akinator

New Member
Quick update: It seems as if the true sound issue has been discovered. The phono button was not getting good contact and when disturbed would cause a sound cut out. Apparently when I'd hit the side B button to test side B, it would be enough vibration to disturb it. I had to take off the face plate and tuner led's to gain access to clean. So far - so good.
 
Status
Not open for further replies.