Hi lads!
So for my first post here (besides introduction that doesn't really count), let's go big: the restoration of my boombox, the Crown CSC-980L.
I snagged this beauty for a hundred euros on a french used goods website. At first I thought I'd buy a fully serviced boombox, but seeing the prices I changed my mind. And after going through some restoration tutorials and stuff, I thought I'd be able to manage with a faulty unit. So I bought this (big) baby, described as "good cosmetic condition, tape deck not working".
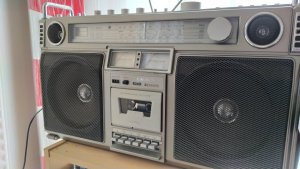
After getting it, I did a quick check: a few dents and scratches (not unexpected for an early 80s device), broken radio tuning knob, bent antennas, tape deck not working (as described) but I could hear the motor which was a good thing, a bit of hiss with the volume knob, and radio working just fine. I was pretty surprised by the sound quality, far above what most people would expect from this old lady.
So, time to open the beast and start the serious things!
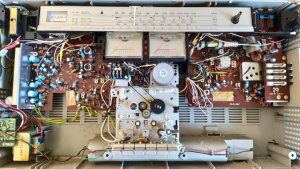
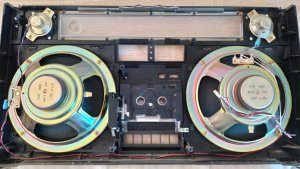
As you can see here there wasn't much to say. A lot of capacitors (that I already planned to replace due to their old age), a lot of dust and dirt... Surprisingly one of the belts was still here, although being a bit loose: the tape counter belt. Every other belt have turned into a disgusting sticky paste, which was a pain to clean. Thankfully, isopropyl alcohol does wonders.
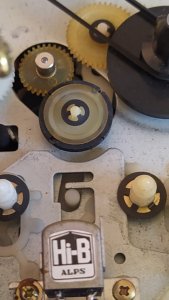
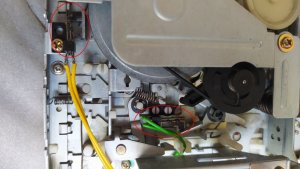
The biggest problems were of course concentrated on the tape deck. First of all, the belts. Thankfully I've got some that were the perfect size, since I bought 2 bundles of belts to restore an Aiwa walkman (a pending project). Then there was that rubber wheel which probably have a technical name but being a complete newbie I have no clue. It was split in 4 parts and not salvageable. I tried to find a spare but couldn't, so I checked if it was possible to glue it back together, which didn't work since there was a gap. At the edge of despair, I found a perfect replacement: plumber O-rings. Turns out I could find one with the exact same size, and it worked perfectly. Once this was out of the way, I had to take care of a terrible humm sound coming from the tape deck. The culrpits were two contactor on the back, that had A LOT of oxidation. They were really hard to clean out but I managed to make it work. The final issue after all of this was the playback speed, but having an album both in tape and digital format, I could set the right speed by playing both versions and synchronizing them. I assume there are better tools for this, but once again I'm a beginner with no experience in boomboxes and very few electronic tools.
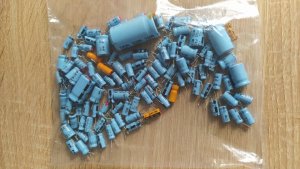
The capacitor replacement was probably the longest task. First, listing them all (more than 100 capacitors, from 21 different sorts) and mark them so that I could see if I forgot any. I asked my sister to give me some red nail polish for this, it worked perfectly Naive as I was, I thought I could find replacement parts from the same brand and models, to stay as true as possible from the originals... But, as most of you probably know already, it was impossible. I could find the matching capacity, but in most cases had to go for a higher voltage. At least I could simplify it a bit and lower the different types of capacitors from 21 to 17. Pictures below are the usual before/after, and the replaced parts.
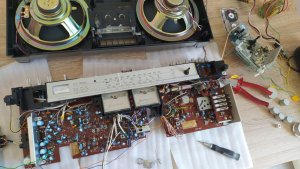
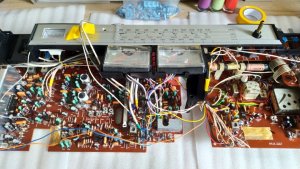
Once everything was done, and every potentiometer/button cleaned, it was time to put it back together. Of course the whole shell was already fully cleaned and ready, but then there was a dilemna: should I repaint it or not? Since, on this model, the handle was replaced by a strap that was missing and I couldn't find an original replacement, I decided to go for a compromise on the aesthetics: there would be a bit of customization, and I would let the few dents and scratches untouched. They're the marks this boombox got over its lifetime and I didn't want to erase that. But instead of just leaving it as it was, I'd add my own touch over it, as an additionnal layer of life.
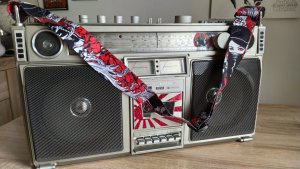
Crown being a japanese brand, I decided to go for a red-themed customization, but keep it light and removable. So I ordered a couple of vinyl decals that I added on the tape deck and on the radio dial. Bot are aluminium parts so colors won't fade around the decals, leaving no visible marks if I remove them. For the shoulder strap, I simply used a guitar strap with matching red/black/white colors, with a bit of sewing job to make it fit its new purpose. Which gave the following result:
So, we are reaching the end of this long post. Overall, I'm really happy that I chose to restore a boombox instead of buying it fully serviced. Not only because of the cost difference (overall I got the boombox and all of the various parts for roughly 200~230€) but also because it was a fun experience and I've learned a lot. Most of you guys would probably have done better and faster, but I think it's quite decent for a first time, and I'm really prouf of the result
Now that I have a fully working boombox with a killer look and stellar sound quality, all I need is one of these line to phono converters so that I can record mixtapes. That's one of the things I forgot to check before buying the device: the difference between phono and line in... I'm still learning from my mistakes here.
Let me know what you think about it, what could be improved and stuff like that
So for my first post here (besides introduction that doesn't really count), let's go big: the restoration of my boombox, the Crown CSC-980L.
I snagged this beauty for a hundred euros on a french used goods website. At first I thought I'd buy a fully serviced boombox, but seeing the prices I changed my mind. And after going through some restoration tutorials and stuff, I thought I'd be able to manage with a faulty unit. So I bought this (big) baby, described as "good cosmetic condition, tape deck not working".

After getting it, I did a quick check: a few dents and scratches (not unexpected for an early 80s device), broken radio tuning knob, bent antennas, tape deck not working (as described) but I could hear the motor which was a good thing, a bit of hiss with the volume knob, and radio working just fine. I was pretty surprised by the sound quality, far above what most people would expect from this old lady.
So, time to open the beast and start the serious things!


As you can see here there wasn't much to say. A lot of capacitors (that I already planned to replace due to their old age), a lot of dust and dirt... Surprisingly one of the belts was still here, although being a bit loose: the tape counter belt. Every other belt have turned into a disgusting sticky paste, which was a pain to clean. Thankfully, isopropyl alcohol does wonders.
The biggest problems were of course concentrated on the tape deck. First of all, the belts. Thankfully I've got some that were the perfect size, since I bought 2 bundles of belts to restore an Aiwa walkman (a pending project). Then there was that rubber wheel which probably have a technical name but being a complete newbie I have no clue. It was split in 4 parts and not salvageable. I tried to find a spare but couldn't, so I checked if it was possible to glue it back together, which didn't work since there was a gap. At the edge of despair, I found a perfect replacement: plumber O-rings. Turns out I could find one with the exact same size, and it worked perfectly. Once this was out of the way, I had to take care of a terrible humm sound coming from the tape deck. The culrpits were two contactor on the back, that had A LOT of oxidation. They were really hard to clean out but I managed to make it work. The final issue after all of this was the playback speed, but having an album both in tape and digital format, I could set the right speed by playing both versions and synchronizing them. I assume there are better tools for this, but once again I'm a beginner with no experience in boomboxes and very few electronic tools.


The capacitor replacement was probably the longest task. First, listing them all (more than 100 capacitors, from 21 different sorts) and mark them so that I could see if I forgot any. I asked my sister to give me some red nail polish for this, it worked perfectly


Once everything was done, and every potentiometer/button cleaned, it was time to put it back together. Of course the whole shell was already fully cleaned and ready, but then there was a dilemna: should I repaint it or not? Since, on this model, the handle was replaced by a strap that was missing and I couldn't find an original replacement, I decided to go for a compromise on the aesthetics: there would be a bit of customization, and I would let the few dents and scratches untouched. They're the marks this boombox got over its lifetime and I didn't want to erase that. But instead of just leaving it as it was, I'd add my own touch over it, as an additionnal layer of life.
Crown being a japanese brand, I decided to go for a red-themed customization, but keep it light and removable. So I ordered a couple of vinyl decals that I added on the tape deck and on the radio dial. Bot are aluminium parts so colors won't fade around the decals, leaving no visible marks if I remove them. For the shoulder strap, I simply used a guitar strap with matching red/black/white colors, with a bit of sewing job to make it fit its new purpose. Which gave the following result:

So, we are reaching the end of this long post. Overall, I'm really happy that I chose to restore a boombox instead of buying it fully serviced. Not only because of the cost difference (overall I got the boombox and all of the various parts for roughly 200~230€) but also because it was a fun experience and I've learned a lot. Most of you guys would probably have done better and faster, but I think it's quite decent for a first time, and I'm really prouf of the result
Now that I have a fully working boombox with a killer look and stellar sound quality, all I need is one of these line to phono converters so that I can record mixtapes. That's one of the things I forgot to check before buying the device: the difference between phono and line in... I'm still learning from my mistakes here.
Let me know what you think about it, what could be improved and stuff like that
Last edited:


