Not have the technical expertise of Ye Wise Ones of this forum I did an internet search to identify the part I now know as a 'leaf switch'.
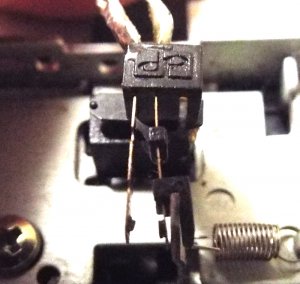
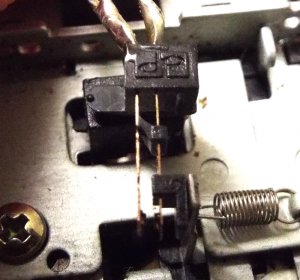
Setting about a clean up and resto of a Panasonic RX-C36 I found the leaf switch to be loose. (At this stage I do not know if this is/was a contributing factor to a rattling sound when tapes are played or not.) The leaf switch has two flanges/hooks that facilitate it being held secure in it's housing, one was missing as it had broken off.
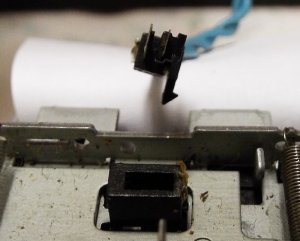
In situ, notice how the leaf switch isn't sitting securely. It's loose and at an angle:
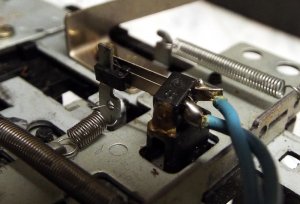
The dark area is where the missing flange/hook should be:
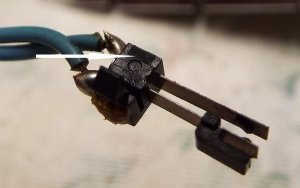
End view of leaf switch held over the rectangular housing. Note each of the shorter sides of the housing, the left-hand side is slightly thicker and will suit the doner part shown further down:
This is what I believe it should have looked like (left of image) undamaged, this is a leaf switch from a (potential) doner box Sharp QT-250. Don't worry about the size appearing different, I had to take two separate photos and put them together so the scale may differ.
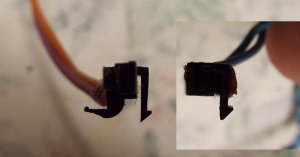
I've looked at both the Panasonic (original) leaf switch and that of the Sharp and they are identical in size, shape and proportion - they're exactly the same. Here I've tried to show them side-by-side but it's darn difficult to get them both sitting just right for ease of comparison. One's a little closer therefore appearing slightly larger and the angle they each sit at has a slight variation but I've done my best (BLUE wires are the original Panasonic):
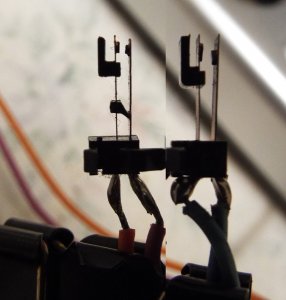
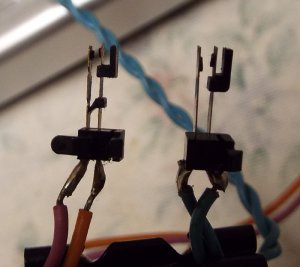
I did say they are both identical but there is one slight difference. Look at the last image, left.........'contact'(?) of the left-hand leaf switch (the Sharp/doner) and you'll see something that is not present in the right hand (original Panasonic) switch. Is this purely some sort of safety feature to ensure the contacts are kept apart when not in use, preventing them from sticking together? The built in flexibility of the two contact arms do not (I feel) appear compromised by this addition.
I'd appreciate any form of confirmation with this as I'm planning to fit the doner part. This is another new thing for me, I'm yet to figure out how to do this as I see my options as being:
1) Easy way:
Just cut the cables of each, swap, re-join them up then use shrink tubing over the joint.
2) Do the right thing:
'De-solder' the joints and re-solder the doner part as it should be done for the best, sympathetic job.
My preference is for the later. I have no de-soldering tool, only a basic soldering iron but, with enough care and attention to detail, hope to be able to achieve a decent result (gulp!).
Any tips will be most welcome!
I'll start a new topic for the cleaning & resto of the box as I planned but need to get this job done first.
Setting about a clean up and resto of a Panasonic RX-C36 I found the leaf switch to be loose. (At this stage I do not know if this is/was a contributing factor to a rattling sound when tapes are played or not.) The leaf switch has two flanges/hooks that facilitate it being held secure in it's housing, one was missing as it had broken off.
In situ, notice how the leaf switch isn't sitting securely. It's loose and at an angle:

The dark area is where the missing flange/hook should be:

End view of leaf switch held over the rectangular housing. Note each of the shorter sides of the housing, the left-hand side is slightly thicker and will suit the doner part shown further down:

This is what I believe it should have looked like (left of image) undamaged, this is a leaf switch from a (potential) doner box Sharp QT-250. Don't worry about the size appearing different, I had to take two separate photos and put them together so the scale may differ.

I've looked at both the Panasonic (original) leaf switch and that of the Sharp and they are identical in size, shape and proportion - they're exactly the same. Here I've tried to show them side-by-side but it's darn difficult to get them both sitting just right for ease of comparison. One's a little closer therefore appearing slightly larger and the angle they each sit at has a slight variation but I've done my best (BLUE wires are the original Panasonic):


I did say they are both identical but there is one slight difference. Look at the last image, left.........'contact'(?) of the left-hand leaf switch (the Sharp/doner) and you'll see something that is not present in the right hand (original Panasonic) switch. Is this purely some sort of safety feature to ensure the contacts are kept apart when not in use, preventing them from sticking together? The built in flexibility of the two contact arms do not (I feel) appear compromised by this addition.
I'd appreciate any form of confirmation with this as I'm planning to fit the doner part. This is another new thing for me, I'm yet to figure out how to do this as I see my options as being:
1) Easy way:
Just cut the cables of each, swap, re-join them up then use shrink tubing over the joint.
2) Do the right thing:
'De-solder' the joints and re-solder the doner part as it should be done for the best, sympathetic job.
My preference is for the later. I have no de-soldering tool, only a basic soldering iron but, with enough care and attention to detail, hope to be able to achieve a decent result (gulp!).
Any tips will be most welcome!
I'll start a new topic for the cleaning & resto of the box as I planned but need to get this job done first.


