spare drawer dimensions & pictures

Status
Not open for further replies.

stragulus

Member (SA)
Sep 4, 2014
171
10
18
48
New York
Could someone be so kind and take hi-res detailed & focused pictures of all angles of the spare tape drawer and post a link to them? I'm trying to come up with a 3D design for one, but lacking one I have to do some guesswork going off of blurry small pictures found here and there.

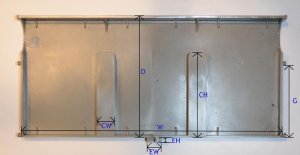
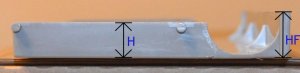
What shots do I need? Good question.. A straight-angled shot from above and all sides, couple of shots from above pointing at each corner. Especially important is the location of all the guide pins.

Thanks a bunch in advance! I'll share the 3D design once I have something. The goal? Well, to 3d-print one of course. Doesn't seem too crazy expensive nowadays, but I have no actual experience with 3d printing at all, so it will be an interesting learning experience as well.
 

caution

Member (SA)
Mar 25, 2014
2,517
347
83
Boomboxery
I had a few already, and took a few more. If you want to go all the way and make it as close as possible I can get you dimensions with a caliper. From the pics you could probably figure out all of what you'd need me to measure. I measured a few already, the pins are 3.8mm dia. and 3.2mm tall. The walls are 1.85mm thick. The drawing I did for the drawer trim would work for the front's details since it effectively fits into a pocket.

I could send you the DXF I made for the tray liner, that will give you the dimensions for the inner outline and the ridges/separators.


stragulus

Member (SA)
Sep 4, 2014
171
10
18
48
New York
Excellent! That is very helpful. I've marked the dimensions I'd like to know (in mm) in the 2 images below.

Couple more questions:

How does the slide/spring mechanism work? There's a piece of plastic on the inside of the case that the pin (that looks like it's broken off on your drawer) locks into. And then there's a spring. What is the spring attached to? Best pictures I've seen are in this comment, but it's not quite clear to me: https://boomboxery.com/forum/index.php/topic/11241-what-would-you-conion-c100f-aka-folks-want/?p=140733

Also, what prevents the drawer from rattling around? And the tapes inside? The liner there will do a lot of good I presume. The design file for that will indeed also be helpful.


conion drawer - top view - dimension markers.jpg

conion drawer - side view left with dimensions.jpg
 

caution

Member (SA)
Mar 25, 2014
2,517
347
83
Boomboxery
CW=17 at the base, 16.4 at the top. CH=76 at the base, 75.4 at the top. The walls of the separators are slightly sloped, probably to keep cassettes from jamming as they are tilted to be removed. D=107.5 when measured from the plastic on the ends, it was closer to 107 along the trim. W=228.6 + 1.8 + 1.8 (yes it's 1.8 not 1.85, I wasn't squeezing) = 232.2. EW=13.4. EH=4.5. "ET"=2. G=64. H=14. HF=18.

Yeah there is another piece of plastic you're not seeing, and a safety pin type spring. Nothing is wrong with the tray, the pin has a right angle bend at the end and slips into that hole on the ear. As you push it in and out it travels an oblong groove in the other piece, in much the same way a pen button works. Let me know if you need any more values, otherwise I'll reinstall it and make a video if you're curious.

The liner is only cosmetic, it will be below the tops of all of those little ridges, which help keep the cassettes (almost) level by elevating the upper, thinner part of a cassette either way it's set in there. The thicker end of the cassette still sticks over the separators by 1.25mm. They'd probably would rattle around a bit if given the chance, but the unit is so massive I'm not sure you would ever notice.
 

caution

Member (SA)
Mar 25, 2014
2,517
347
83
Boomboxery
You're right, my tray needs a tip there. I was wondering what the half-cylinder was doing under the ear. Both trays I have are missing it so I figured it was a molding mark, and I hadn't tried getting either one to work again yet, so I was none the wiser.
 

caution

Member (SA)
Mar 25, 2014
2,517
347
83
Boomboxery
I'm measuring 10mm, but it may be a bit higher on an original, so maybe add .1 or .2 mm and sand down to be sure.
 

wakehappy

Member (SA)
Mar 12, 2016
35
0
6
47
Seattle
stragulus said:
Excellent, I think I got it figured out now. Thanks for your help, it's much appreciated :thumbsup:
Hey stragulus! Did you manage to have any success printing a tray? I recently gained access to a 3D printer... let me know how it went, and if you have a print file I would be happy to paypal you some $ to use it. :-D
 
Status
Not open for further replies.