Question for you car guys...

Status
Not open for further replies.

Transistorized

Member (SA)
Jun 19, 2012
1,838
266
83
USA
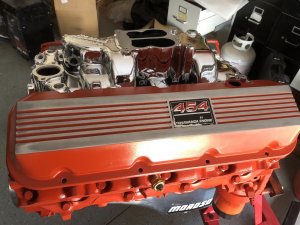
I've rebuilt so many of these engines I recite 18436572 in my sleep :-) You Chevy guys will know exact what this is :-)
 

Superduper

Member (SA)
That is, of course, the firing order of Chevy's but also many other engines. I suspect anyone that attended (and got good grades, lol) in Technical School will know the firing order by heart.

As for the valve covers, I've decided not to use the Edelbrocks after all, and will probably sell them after I've finished polishing them back up. They are the tall variety and because I'm not using exotic valve train hardware, there's no need to use the tall ones, they look too substantial and overwhelming since the induction will be pretty much normal height.

Instead, I found these locally from a builder/fabricator. They had like 40 sets and the shop looks like a car guys wet dream! Hundreds of engines on engine stands all perfectly lined up, each looking like an engine from a Hot Rod magazine. Because we are close to the Speedway, not sure if they do contract work related to that but I can guess.

Anyhow, they part out the factory parts and put on the very expensive ($700 GM Performance valve covers).

So I purchased 2 sets of these, and decided to start with the poorer condition set first.
IMG_1660.JPG

Painted one set:
IMG_1662.JPG

After 150, then 400 grit, here is the result:
IMG_1663.JPG

Progressively switching to ever finer grits, here they are after 2000 grit:
IMG_1674.JPG

New center badges can be purchased for somewhere around $26 ~ $35/pair, but I may just re-use the old scratched up ones. Placed here to see how they look. Ok Ok, I know, it's upside down, but it's not glued down, just placed there. Before final installation, I will be shooting the covers (and the whole engine) with some catalyzed 2k clear. For extra protection, prevent aluminum eventual corrosion, and give more chemical resistance to paint which dissolves almost instantly with brake cleaner. It's an engine after all, and will likely see some chemicals at some point.
IMG_1670.JPG

Here is "approximately" what it's going to look like when installed. I decided I can't stand the shine of the edlebrock "endura-shine" manifold so that's going onto eBay. Need something with a little less "bling."
IMG_1679.JPG

Things are still progressing at a snails pace. Health problems aside, there is simply no hurry as there is no body to stick it into yet. What's left yet is to remove the balancer because 1 timing cover bolt is showing signs of "seepage" of assembly lube. Wouldn't you know it, it's the one right behind the balancer that is impossible to undo with it in place. Then I need to install the roller tip rocker arms, install the rest of the top/end valve train parts and set the lash. At this point, the intake manifold can be installed for good and distributor can be set in place, although it will need to come back up when it's time to install engine for ease of installation, but also in order to pre-prime engine. Well, almost done.
 

JVC Floyd

Inactive (Delete)
May 6, 2009
7,322
419
83
54
Maryland USA.
I must admit I like the 454 valve covers better combined with that Chrome intake it looks awesome.

Norm get rid of that goddamn fram oil filter those things are junk trust me I know. I use the Mopar Factory filters in my Jeep and AC Delco filters in my truck.
 

Superduper

Member (SA)
Floyd, that oil filter is finger tight and only intended to seal the engine to prevent bug infiltration and paint mask as I’m assembling the engine. Will probably also use for initial break in (20 minutes). After that, the filter & oil needs to be changed out anyhow and it will have served its purpose. The oil will be high in zinc additives, dissolved assembly lube & other stuff.
 

Superduper

Member (SA)
JVC Floyd said:
I see the mock-up oil filter totally logical. excuse my ignorance lol.
What you can't see is that 2 dogs reside in that garage, and they are shedding like a group of abominable snowmen in the desert. It gets into every nook and cranny and crevice. Every time I pick up a tool, if it is at all greasy, it is completely covered in fur. And the more I wipe, the more fur gets on there because it's on the roll of paper towels too. Also, at this time of the year, these pesky wasp looking things keep flying into the garage and building these sandy/mud igloos everywhere and anywhere there is...... a hole crack or crevice. Therefore, I make it a point to keep as many holes and ports plugged if at all possible. The filter was like $3 at Walmart and easier than applying masking tape to the oil filter adapter when it came time to paint the engine. A few simple twists and it's all sealed up! At least those holes. You can even see the orange overspray on the filter, lol. The rest of the time, the engine has 3 layers of plastic bags covering it. So yeah, I bought the very cheapest oil filter I could find for that purpose. As soon as the engine is started up and run through the break-in routine, which takes 20 minutes at 2000-3000 rpm, everything will be drained and the filter replaced. Putting in a better finer filter will only ensure it plugs up faster (not good when breaking in). So yeah, there's method to the madness. :yes: :-D
 

robgmn

Member (SA)
Apr 28, 2018
32
0
6
Before I got through your post, i was thinking "those fins would look good stripped and mirror-polished", then I read "2000 grit" and knew what the following picture would be (I use 2K to get mirror edges on knife blades sometimes).
Looks good!

A question if I may on painting for chemical resistance: My son and I restored my 1969 Rupp minibike last year as a father-son project. No spare $$ to re-chrome the gas tank, so we rattle-can sprayed it with a bright silver, which was left to cure for several months.
It melted with the first minor spill of gas (not unexpected).

Any suggestions for doing something that will withstand gas long enough to grab a rag and wipe it off if some spills during fueling?
There are a lot of Google hits about paints that will NOT resist gas, but I'm not having much luck about those that CAN resist it.
 

Superduper

Member (SA)
Yes, if you read back to my July 12 post, you’ll see mention of 2k clear. All professional paint today are 2 parts, paint & hardener. It’s true exterior car paint & last time I checked, the paint around filler area of my cars is still intact. The only thing about it is that the hardener uses isocyanates that is deadly poisonous if inhaled or absorbed through body so the proper protection apparatuses need to be donned, and I’m not talking about the masks with the loopy stretch over ears stuff. Talking tyvek suits ($10 @ Home Depot) and chemical vapor cartridge masks that seals properly.

That being said, these paints are now available in spray cans. Through some ingenuity, Spraymax developed a can of paint that has a hardener component separate from the paint. You break open the seal separating the hardener from paint by depressing a button under the can, thereby allowing the two to mix. Needless to say, the paint has a short limited shelf life once mixed so it must be used within a certain number of hours or the can becomes unusable.

Google 2k clear spraymax for more info. You can get them for about $25/can or $40/2-cans on eBay. Figure in another $30~$40 for protective gear which may be one time or disposable for painting purposes (if vapor filters are non replaceable).

BTW, the reviews for this product is very good so they’ve done something right with this product. But you won’t find them at Walmart due to safety reasons. It’s really intended for professional use for small jobs where cleaning spray equipment afterwards is unwanted.
 

trippy1313

Member (SA)
Jul 16, 2013
2,111
96
48
37
Seattle-Tacoma, WA
robgmn said:
Before I got through your post, i was thinking "those fins would look good stripped and mirror-polished", then I read "2000 grit" and knew what the following picture would be (I use 2K to get mirror edges on knife blades sometimes).
Looks good!

A question if I may on painting for chemical resistance: My son and I restored my 1969 Rupp minibike last year as a father-son project. No spare $$ to re-chrome the gas tank, so we rattle-can sprayed it with a bright silver, which was left to cure for several months.
It melted with the first minor spill of gas (not unexpected).

Any suggestions for doing something that will withstand gas long enough to grab a rag and wipe it off if some spills during fueling?
There are a lot of Google hits about paints that will NOT resist gas, but I'm not having much luck about those that CAN resist it.
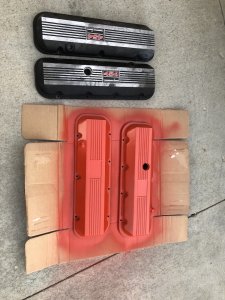
You'd really have to use a clearcoat over the color and as Super mentions a two part (or 3 part, clear-reducer-hardener) would be better. Single stage paints such as what you likely used, will always have something come off when exposed to solvents (gasoline included). Just the way it is.
 
Status
Not open for further replies.