New to the group - first box is a Goldstar TSR-801!

thinkchronicity

Member (SA)
Jul 5, 2018
176
33
28
Surrey, UK
Quicker than measuring them all and individually ordering them...
I hope it's a good kit. The first boombox kit i bought from Ebay was way too tight. So watch out for that and compare the new with the old (the cross-sections too - a belt with a thicker wall will up the speed, mind you the motor's adjustable here).
 

CharlieCanuck

New Member
Oct 9, 2023
17
4
3
Ontario
Thanks! That's what I was thinking. If I could find a kit by part#, then great. Just go for it. Price was harsh but I can afford it. Saves time with fiddling with sizing. I will remove each of the five belts and compare before I commit to each replacement. Obviously my flat belt is no longer doing the job so that one clearly must go. The rest I'll play it by ear. Thanks to your comments, I'll look for sticky grease or sluggish movements and clean up as needed with alcohol and then regrease. Not really sure what all I need to take apart yet. From my last look it should be the rear plate that holds the motor and flywheel in place only.
fwiw I don't have a test tape nor much experience with dialing in the speed beyond just by ear with something I know well .All advice is appreciated.
 

thinkchronicity

Member (SA)
Jul 5, 2018
176
33
28
Surrey, UK
Yes i think just the rear plate gets you to those three belts. I'd draw a diagram of the pulleys and stuff - it's easy to get confused.
If you buy a 3000Hz test tape, then if you have a musical ear you can compare it to a 3k tone on youtube. Or even cheaper method play a pre-recorded album and compare the speed to a version online. But you must have a freq counter i'd imagine. I use a ceramic screwdriver to adjust the motor pot. Clockwise increases the speed. If the ceramic won't fit and i have to use a metal one, i don't take any chances shorting anything out on the little motor board - so best to turn the unit off and make your micro adjustment that way.
 
  • Like
Reactions: CharlieCanuck

CharlieCanuck

New Member
Oct 9, 2023
17
4
3
Ontario
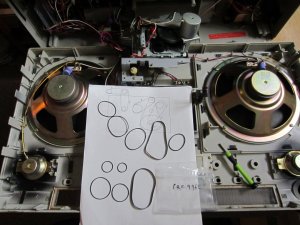
After being preempted by an automotive repair last weekend, I finally got to get into the belt job on this deck. The kit I was provided was unfortunately not great. A couple of the square belts were way too small to work in any position. In the end I ended up using only the flat belt for now, as the others seemed to be in usable shape for the time being.
The replacement flat belt was a bit tight I think. Playback was quite slow. I had to crack the factory seal on the motor speed adjuster and turn it up some. This makes sense to me. More tension equals more friction and so more drag. Since this seems to be the first servicing of the deck belts, I thought it would be closer to correct at the factory setting. I guess as soon as you touch anything in these, all bets are off as they say.
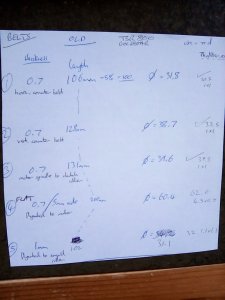
Anyway, I wrote to the seller, he asked for measurements and has sent me out replacement belts. So we'll see if he has a flat belt closer to the one I removed, only not all stretched out. Fwiw the flat belt in the kit was said to be 86mm, was actually around 90mm and the one I removed was about 97mm (folder lengths), although it doesn't stay on the crown pulley so it must be somewhat stretched. I don't know how granular the sizing is, but I'm hoping I get something like 95mm. For now the flat belt I got is doing the trick. The unit plays not bad. I think the extra tension is causing a bit of flutter but it isn't too noticeable.
I haven't made a proper test tape yet. I do have a very good ear for measurement. The compare a factory album on tape to the same track on YT method works very well. Before long, I was flipping back and forth from an album on tape to the same album on CD fed into the line in. Very effective. I'm considering drilling a small tape speed adjustment hole in the back panel of the unit today. Some machines have this, some don't. I see no reason not to have one on this thing, especially if new belts might relax over time. I did use a plastic tweaker, although the adjustment screw on this motor is quite safe with no exposed components.
Finally, I'm having a good bit of trouble with the function switch but only in the Tape position. It's getting better, but I'm having to play with it a lot to keep the left channel coming through at proper level. I don't know if the switch is worn out in that position or if I'm just not getting the contact cleaner where it needs to go. (I've soaked it good a few times now.) If I can't get it working well, I may try swapping it with the Tape Select switch which is the only other switch of the same type. The Phono/Line In switch was doing similar things in Phono/Line In mode but that one cleaned up fine and works fine now.
So just fiddling with these old switches and a bit more cleaning and polishing while I wait for more belts. Happy Saturday all.
 

Attachments

thinkchronicity

Member (SA)
Jul 5, 2018
176
33
28
Surrey, UK
...well done for hanging in there! It's frequently not easy restoring these. Doesn't help when you get dodgy belt kits - those small ones in the kit pictured are way off.
I kept a note of old and new belts when i did mine four years ago. The 'old' column is total circumference as i snipped them, 3rd column is diameters with 5% taken off the old belts, and 4th column on the right are the actual size belts in diameters i could get from Thakker.eu in Germany. The flat belt i got comes out at about 97mm on the half circumference (folded) figure. So mine's definitely not too tight. Getting 0.12% w&f currently, not really audible.

Yeah the selector switches are not the best quality. Without taking mine apart i can't describe exactly where i squirted, but i remember doing it twice on realising i wasn't quite in the right place. If you want some inspiration on cleaning or taking apart switches check out 'mend it mark' on youtube. There's one video in particular, i'll try and pull it up.
 

Attachments

  • Like
Reactions: CharlieCanuck