New to the group - first box is a Goldstar TSR-801!

CharlieCanuck

New Member
Oct 9, 2023
17
4
3
Ontario
Hello Boomboxery members!

It's my first post, so I'll introduce myself a little and tell what you can expect from me.

I work in broadcasting as senior software QA. I have worked on electronics for several decades. I collect vintage electronics fairly heavily. At the moment I am into very vintage analog television. I have specimens from the 1980's, 1970's, 1960's and I have one beautiful 1950's set which I have completely restored electrically. I also do antique radios, older cabinet stereos. Mostly all tube. But I also do 1980's component stereos. My pile of Realistic is large and I have some other sweet receivers as well.

As for boomboxes, I have a couple component portables and a couple smaller double deck dubbers, who doesn't, but been keeping my eye open for a one-piece for about a year I'd say for a price I could stomach.

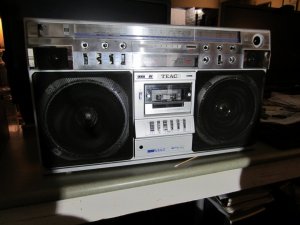
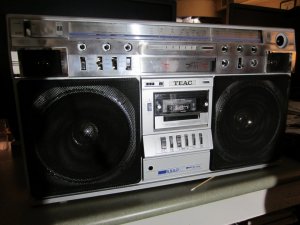
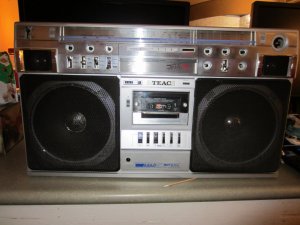
Two days ago, it finally happened. Picked up the apparently quite respectable Goldstar TSR-801 untested for stunningly cheap. (badged Prosonic PQR-9962) Since people are going to be curious what I mean by that, it was CAD$40. Cosmetically it is 9/10. One hard to spot kink in one antenna tube which will soon be fixed, and lots of dirt. Nothing missing.

As you can hopefully tell from the above, I'm not allergic to research and am decently educated in this realm, but this is my first proper one piece big box and I'm just getting into it. I have searched the forums here and read up somewhat. I did find the service manual at archive.org, so thanks to whoever made the post to go search for it there.

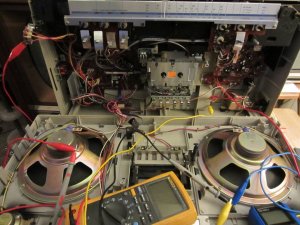
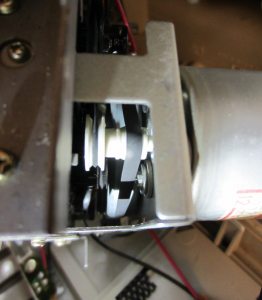
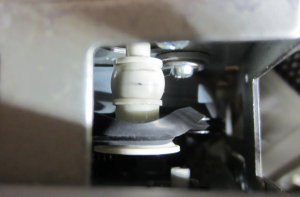
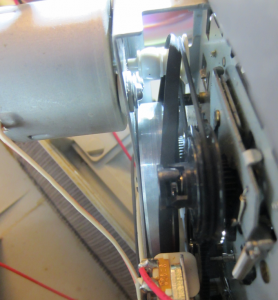
The box has power issues. I'm getting no Operation LED with either AC or DC. No radio or line in activity. It appears tape transport was left engaged. I gently pushed it back down but probably not correctly. (I read things about advancing the flywheel which I'll play with today). My plan is to get the power issues sorted, then see what sort of shape the whole tape mechanism is in. When I apply DC power, I'm getting nothing. Zilch, zip. When I apply AC power, I can use the fast forward and rewind with the power switch on or off/standby and the pause LED works too. I understand the tape section should be getting power even in standby mode, so that is encouraging. Play does nothing at this time. I hear a faint pop from the speakers when I flip to on, or if I engage ffd or rwd when in standby. I've been inside briefly and saw no obviously damaged components or wiring. I think the unit has been asleep for quite a while.

So that's all I have for now. I'd like to ask two easy questions to start.

1. Any chance anyone knows of issues like the above with the TSR-800/801? Similar experiences or ideas where to start zeroing in?

2. Is there a source for belt kits for these in the world that anyone knows about, preferably In North America? Or are we all on e-Bay best fits (of which I do have some)?

I plan to head back in later today with a scope and start chasing things down.

Thanks for reading! Can't wait to see and hear this thing live again.

Best regards to you all! I learned a lot from you already and had fun going through many of the threads here. I saw the 2017 UK meetup! MicrosoftTeams-image (4).png
 
Last edited:

CharlieCanuck

New Member
Oct 9, 2023
17
4
3
Ontario
A quick first update to cut out some plain suspects.

I have now confirmed that DC power is making it to the main power switch (s209), as well as through it for all three power options. So the main BATT/DC/AC power supply section seems to be working fine. Nothing to lube or clean or poke at there at this point.
I continuity tested the main switch carefully to make sure I understood the connections and that it was working perfectly. Then did some power up tests. In my previous test with DC in (Center negative) and Battery in, I may have had the logic misunderstood in terms of power priority. That is, the leaf switch cuts out battery bay if the DC barrel is in, and both DC sources are cut if the AC line is in. Perhaps I had more than one thing in but not connected and the leaf switch interfered with my tests in the expected way. Not sure, but anyway I now get a little pop out the speakers for any option of input power as well as the FFW and RWD functions work, and power is making it through the main power/standby switch in all cases.

Moving on. Starting to look like I'll be doing some recapping sooner rather than later.
 

Attachments

Reli

Member (SA)
Dec 24, 2010
6,324
455
83
USA
First thing to check would be to clean all the toggle switches with DeOxit, if you haven't already. Then advance the flywheel a few times to bring the heads back down (you'll hear a click).
 

CharlieCanuck

New Member
Oct 9, 2023
17
4
3
Ontario
I saw the flat belt loose and flopped about back in there in the tape mech, took it out and carefully fished that belt back onto the flywheel and opposing pulley. Play now also works, although there's nothing to hear because no amp. Tape operation seems stable. Belts stay on for now. Not sure how long that'll last.
As for the power/amp issue, could a dirty switch downstream of the main power switch really completely disable the AMP and the power LED altogether? Will try cleaning all of them next (I did actuate them plenty), but starting to eye up some of the electrolytics on this big main board around the power transistors.
Thanks for the reply!
Edit: Got the click thing down. Cool. Getting the hang of this mech. Flat belt hopped off a second time though, so that is essentially hosed until I find a replacement. After much switch cleaning, no one home in the amp section. Time to go back to the notes and figure out how this all comes out so I can properly diagnose.
 
Last edited:

CharlieCanuck

New Member
Oct 9, 2023
17
4
3
Ontario
Not the easiest rundown. Looking like going to be shorted filter cap somewhere, bad transistor, maybe a crack in the main board somewhere. I can tell that the main amp circuit is trying to work and so is the standby circuit, because if I run the tape in standby I still get the little pop from the speakers. Seems the amp is trying to start and failing. Again that is a guess. Thanks to the service notes I'm tracing my way through and should be zeroed in soon.
In play the belt very quickly squirms down the motor shaft and falls off the flywheel. I'm curious as to why the motor shaft where the flat belt runs opposite the flywheel is a sort of oval shape. I'll add a pic later. In any case it would seem to be obviously too loose, so I'll need to replace that one at the very least. What's your favorite source for smaller flat belts? I haven't seen as many as I've seen square belts, except for turntables of course. Thanks for the reply!
 
Last edited:

CharlieCanuck

New Member
Oct 9, 2023
17
4
3
Ontario
This motor spindle just looks odd to me. Never seen one like it before. Almost seems like the fat center is just asking for the belt to walk to one side or the other of middle. But I guess if this belt weren't so stretched out it would hold onto one edge, keeping it in place. Too many Walkman belt drives for me I suppose.
Looking for tips on where to obtain the flat belt in any case. Remove, measure, then?

Now back to the task at hand. Trying to determine where main supply voltage gets lost on this main board.
 

Attachments

CharlieCanuck

New Member
Oct 9, 2023
17
4
3
Ontario
Quick update: Belt kit located and ordered. Bad semiconductor located on amp board. (TR218 has an open collector). Carrying on.

Since a couple members have done the belt job on this exact unit, any tips or guidelines that might make the job easier and more straightforward? Everything looks to be buttoned in pretty well. Haven't seen a video resembling this particular 5-belt mech...so far. Have had my head in the mainboard and only a cursory look at the tape deck exploded diagram.

Thanks all.
 

CharlieCanuck

New Member
Oct 9, 2023
17
4
3
Ontario
Thanks AE_Stereo! Brilliant!! I get how the crowned pulley works now. Rubber physics is crazy!
What I noticed last night while goofing around, (it was bugging me that the current belt kept leaping from the cliff so easily and I wanted to understand it) was that if play was engaged with no tape in place, the belt would jump on the crown pulley but could recover in a rotation or so, but with a test tape in place, the added torque caused it to jump too far and within that first half turn fall off instead of correct itself. After watching the video it's all clear. Mine's just a tad too loose from age. Very neat!

As for the belts, I don't plan on making too big a habit out of this particular niche object, although these are very cool. As you can guess space is at a pretty desperate premium here. Since this box and I will be buddies for awhile, I figured just change all the belts. I have the few bucks to spend on it given how cheap it was and if I ever let it go I can say they were all changed. Thanks for your preply!
 
Last edited:

thinkchronicity

Member (SA)
Jul 5, 2018
176
33
28
Surrey, UK
Hello and welcome Charlie.
I got into this game five years ago and the fourth box i got was your one. I've done a few posts on it if you're curious. I was going to tell you the five belt spec, but you've sourced them (where from btw?). It's not too bad replacing them, but a bit of a juggle if i remember, and one of those belt hook tools is really essential for this kind of work.

Great thing with boomboxes is obviously everything 's self-contained, so when you test the deck there's no need to find an amp and speakers to plug into. Well, ok, in your case the amp's down but you catch my drift.
Looks like it won't be long before this monster is shaking the house down again.
 
  • Like
Reactions: CharlieCanuck

CharlieCanuck

New Member
Oct 9, 2023
17
4
3
Ontario
Thank you, Think!
Every new rare thing I touch that has a very specific group of enthusiasts and interest brings risks of getting totally hooked!

I found a belt kit on eBay matching PQR 9962. $30USD plus stupid shipping. and now it's $35 lol. Kinda spendy (around $67 Canadian to my mailbox) but it's all fine. No measuring to do now and I can be a little more careful about it. Not sure how much disassembly needed to free the two deep ones but I'll figure it out. I saw one five-belt replacement vid so far but it wasn't nearly as enclosed as this. Just took a closer look and I guess that hunk on the back holding the motor and flywheel comes off and bingo. I've got me picks and hooks and things.

I went through my parts and only came up with a single somewhat underrated NPN power transistor (plus seven flavors of voltage regulator!). The suspense is real, so going to try to tack it in for a test tonight and hopefully see if there are any other faults lurking beyond it. Then grab something more to spec on the weekend. Gotta hoist this whole dual board assembly out of here sometime, dial plate and all. It might as well be now. :D
 

CharlieCanuck

New Member
Oct 9, 2023
17
4
3
Ontario
UPDATE: Transistor TR218 has been temporarily changed out for a lowly TIP29 30W general purpose power NPN and this thing is alive and kicking! Sounds fantastic actually. Time to get back to cleaning (with soundtrack) while I await more parts.
 
  • Like
Reactions: Radio raheem

dubout

Member (SA)
Nov 19, 2020
205
68
28
Germany
This video will clear all your doubts about the concave pulley.

Just get any flat belt of the correct dia and it will work. Width doesn't matter, for it to work!

Try buying assorted flat belt kit of different sizes from aliexpress.com
Very informative video, thank you! I can't confirm that the width doesn't matter, though. I once had a flat belt with a slightly wider width than the original belt and it wandered off the concave pulley although it didn't touch the edges. A less wide belt stayed in place.
 
  • Like
Reactions: CharlieCanuck

AE_Stereo

Member (SA)
Apr 24, 2012
732
116
43
Abu Dhabi, UAE
Very informative video, thank you! I can't confirm that the width doesn't matter, though. I once had a flat belt with a slightly wider width than the original belt and it wandered off the concave pulley although it didn't touch the edges. A less wide belt stayed in place.
When I said, width doesn't matter, a lower width is what that was in my mind. Yes, you are right, too wide a belt will cause problem.
 
  • Like
Reactions: dubout

thinkchronicity

Member (SA)
Jul 5, 2018
176
33
28
Surrey, UK
Hope it's ok to ask..did your box come with user instructions? I've been looking for them for a while, but nothing doing that's all. How's it going anyway?
 

CharlieCanuck

New Member
Oct 9, 2023
17
4
3
Ontario
Time for an UPDATE:
(Just because my box is working doesn't mean I'm going to ditch out on you guys! You guys probably need something to read anyway.) :D
(Hi Thinkchronicity! Sure it's ok! stand by)

Still patiently awaiting 5 belt kit. Expect them any day now.

On the subject of the failed TR218, I did some further analysis of the circuit and determined that there is no way that the regulator in the power supply section can do much more than an Amp. This means that the TIP29 (NPN) that I dropped in is actually suitable for the job, with a continuous collector current rating of 1A and a peak rating of 3A. It has just enough hFE to maintain the ~8.7V output as the current rises with more volume. I did a test in my garage where I slowly cranked the volume to full blast while playing the line input and monitored the output of the TIP29 at the emitter, which stayed at 8.5V solid all the way up to full and didn't overheat. So, nothing further to do there. I could lower the base resistor maybe one value to get closer to the 8.7V in the diagram, but I'm not going to bother. Amp is working well and sounds fantastic. If the TIP29 ever fails, then I'll go up to a TIP41C and not until. I imagine it will take years as I can't get the unit past about level 3 volume indoors without needing hearing protection. :D

Where it comes to the cleaning, I was having a bit of an issue with the hazy oxidation stains on the brushed aluminum plate. I couldn't seem to leave that alone and just be satisfied with it. Of course, this can be tough to deal with. Iron and mild steel get rusty. Aluminum gets white and crusty. I wonder if you all have seen what aluminum wheels look like after 10-15 Canadian winters. Windex with vinegar didn't do a thing. Straight vinegar didn't do much. Went to a bit of metal polish and that didn't do much either. (Silvo is what I had on the shelf.) I was about to give up and just leave it and deal, but decided to have a last lick with some car polish. This actually started to make a marked improvement, getting off at least the bulk of the oxidation and bringing out some shine. (The metal polish is just too fine for this level of oxidation.) I had Meguiar's Ultimate Compound on the shelf as well as Mother's California Gold Pure Polish (stage 1 of their 3 stage waxing system). I have these to touch up blemishes on my 1940's car. The Meguiar's started to make a noticeable improvement here, Mother's did even better. It was able to pretty much erase the stains and get a decent dull shine going. When I'm done polishing with this stuff, I will likely add a coat of car wax to this plate only to help keep it from getting crusty again too soon. (The oxidation actually protects the metal to a point, which is one reason why aluminum parts last so long!)
I want to note that if you do this around painted marks, the marks will be slightly compromised. I was being very gentle around words, but it's hard to avoid them altogether and polish around them. I haven't lost any letters entirely, but some letters are a bit thin and not as bold and sharp as they were. This is acceptable to me as a trade off for getting the worst of the white ghosty stains off. My old Canon Powershot doesn't really capture the stains, so I'm attaching a before and after strictly to show what you can expect with the letters if you use this method on brushed aluminum. (i.e. Small gentle circles with a soft cloth and a clearcoat safe car polish.) You will notice in the photos that the second half of "Volume" and the numbers in "SW1" and "SW2" are compromised and look somewhat thin and faint compared to the words MIC MIX and LEFT where I have not polished yet. Again, I'm okay with it for the overall cleaned up look of the plate metal.

Think, was your unit really hazy around the control plate? The box didn't come with cord or instructions and the service manual as you have probably seen doesn't instruct on how to use the system. I watched most of the youtube videos featuring this unit, which describe how to use the Automatic Search and Play thing. Pretty neat. Skip forward or back through up to five songs on tape and start playing automatically. It's sort of like the next button on a CD player, but for tape! Hit it one to five times and then Ffw or Rwd while in Play mode. I still do not know what this EDITOR button is for. Once I have the tape deck running I'll try to figure it out, unless someone else here knows!
IMG_4749.JPGIMG_4750.JPG

More to come.
 

thinkchronicity

Member (SA)
Jul 5, 2018
176
33
28
Surrey, UK
Yep, my aluminium plate is showing quite an aged patina. I just gave it a wash - i had so many problems that was the least of them! Mine has blue customized speaker grills ( you can find it on google images if you search tsr800).
I *think* the Editor button is a record mute whilst recording (mine's got a siezed record mech section so i hope to find out for sure when i finally strip half the mech).
Be interesting to see how the deck keys function with the new belts. I had old grease that had to all come out, plus a couple of weak springs. That was in the lower section of the mech btw, which comes off nicely with only 2 screws.
 
  • Like
Reactions: CharlieCanuck

CharlieCanuck

New Member
Oct 9, 2023
17
4
3
Ontario
Well it's shocking but, I'm actually quite happy with this result. A couple of passes, not too much vigor. Quite a difference. Just need to seal it up with some wax now.

Interesting. I think I managed to get the record arm to stick out while playing with the weak belt. We'll see how mine works once it is restrung.

Will update!
 

Attachments