** Another rubbish pile find - Sharp GF-8080 **
- Thread starter jimmyjimmy19702010
- Start date
- Status
- Not open for further replies.
Just recently I realised my mother-in-law has got one (SHARP GF-8080) in her kitchen, and it has been playing every day (local radio station) for over 30 years! Left speaker just went silent, and after several months right one got very quiet, and finally died.
Oh, no, not on my watch! What was wrong?
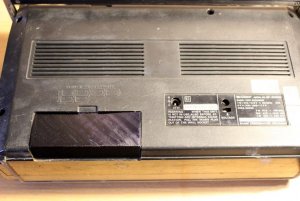
First the obvious thing, battery cover was missing. Next, two switch levers are broken (tape/radio/sleep and mono/stereo/wide), rightmost one is still ok. I would appreciate very much if anyone can get me a replacement.
The unit was in damp room for long time, so I have left it in warm, dry place for several weeks. It got grease and plenty dust from last century and all that clogged the switches, and there are plenty of oxidised contacs there! After liberal drenching in Kontakt 60 spray, some kind of noise got thorugh. More of the same in potentiometers, and things got better, but... No radio or tape action...
After inspection of the motherboard, I noticed that output capacitors (1000uF 10V) have gone bad. I found in my drawer some old ones, back from 1980. There was no sense in putting new caps! It would look silly. I could not get the Elna caps, but these were close in size and color. Now I got the sound in the right speaker!
It turned out that left speaker was fried. Probably due to leaky/shorted output capacitor, who knows? I'll have to take it apart, perhaps It can be saved. If I can't repair it, I'll have to place another, new speaker, and I would hate to do that.
I also noticed that "stereo" indicator LED was not working. Strange... I have had one red LED from 1979, same size and colour, but not completley the same. Well, at least it works now.
Next thing that got my attention was tape assembly. The motor was not running. So I took it apart. It was very dusty, mostly from carbon contacts on the motor rotor. I have cleansed it thourughly with brush and some solvent, fine sanding paper for rotor contacts, and after that I have put some fine oil on the bearings, and assembled it back together. Now the tape reels spin! I have found one old cassete from 1984, and it does play, but rather badly, and it is too quiet. I need new belt(s), but for now, it can stay this way. This unit has AC erasing, and it works ok.
Last thing that does not work is the tunning indication (indicator does work while recording is on). There were no loosend parts or something easily visible, so I had to download the schematic from the internet. Now I am working on finding what is wrong...
All caps have date code from early 1977, and uPC585 has date 26 week 1974!. There are no datecodes on Hitachi TBA810S audio power amplifilers, but I guess that it is rougly the same. Since GF-8080 was produced 1977-1979, I guess this unit is close to 40 years old!
I'll keep you posted... Perhaps some images would also be nice?
Oh, no, not on my watch! What was wrong?
First the obvious thing, battery cover was missing. Next, two switch levers are broken (tape/radio/sleep and mono/stereo/wide), rightmost one is still ok. I would appreciate very much if anyone can get me a replacement.
The unit was in damp room for long time, so I have left it in warm, dry place for several weeks. It got grease and plenty dust from last century and all that clogged the switches, and there are plenty of oxidised contacs there! After liberal drenching in Kontakt 60 spray, some kind of noise got thorugh. More of the same in potentiometers, and things got better, but... No radio or tape action...
After inspection of the motherboard, I noticed that output capacitors (1000uF 10V) have gone bad. I found in my drawer some old ones, back from 1980. There was no sense in putting new caps! It would look silly. I could not get the Elna caps, but these were close in size and color. Now I got the sound in the right speaker!
It turned out that left speaker was fried. Probably due to leaky/shorted output capacitor, who knows? I'll have to take it apart, perhaps It can be saved. If I can't repair it, I'll have to place another, new speaker, and I would hate to do that.
I also noticed that "stereo" indicator LED was not working. Strange... I have had one red LED from 1979, same size and colour, but not completley the same. Well, at least it works now.
Next thing that got my attention was tape assembly. The motor was not running. So I took it apart. It was very dusty, mostly from carbon contacts on the motor rotor. I have cleansed it thourughly with brush and some solvent, fine sanding paper for rotor contacts, and after that I have put some fine oil on the bearings, and assembled it back together. Now the tape reels spin! I have found one old cassete from 1984, and it does play, but rather badly, and it is too quiet. I need new belt(s), but for now, it can stay this way. This unit has AC erasing, and it works ok.
Last thing that does not work is the tunning indication (indicator does work while recording is on). There were no loosend parts or something easily visible, so I had to download the schematic from the internet. Now I am working on finding what is wrong...
All caps have date code from early 1977, and uPC585 has date 26 week 1974!. There are no datecodes on Hitachi TBA810S audio power amplifilers, but I guess that it is rougly the same. Since GF-8080 was produced 1977-1979, I guess this unit is close to 40 years old!
I'll keep you posted... Perhaps some images would also be nice?
Thanx mate!
Just to finish the story for today... After four hours of cramping over this GF-8080, my wife finally enters the room and says: "When you are going to finish my radio?" It turns out that she got it from her aunt about 25 years ago, when she was in college. Areal (antenna) was broken back then, as well as signal indicator, and tape deck. Now I have some more inspiration to repair this boombox!
After a lot of measuring, finally the culprit was found: bad on-board via. This unit has printed resistors and vias on the component side of the board! See the image below.
I just have finished the repairs, except the left loudspeaker (10 cm, 4ohm, 2W). The cone looks good, but the coil has infinite resistance. Does anybody know how to get it open without breaking the paper? If everything fails, I'll have to get a new one...
Finally, I have to clean the outside of the unit and get the new tuning knob.
Summary:
Time needed: one sunday
Failed parts:
- Elna electrolytic capacitors 1000uF 10V (2 pcs.),
- one red LED,
- one speaker 2W-4ohm-10cm
- one on-board via
Misc: Kontakt60 spray, celaning alcohol and soapy water
I have attached three images:
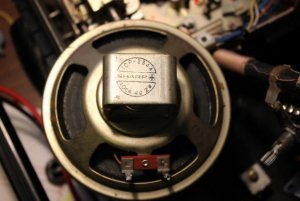
Dead speaker.
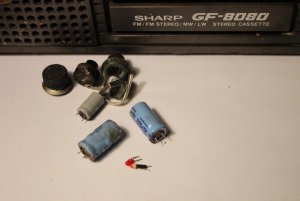
Knobs and failed parts, as listed above, plus one "new" 1000uF 10V capacitor, and a 3mm red LED from 1980's.
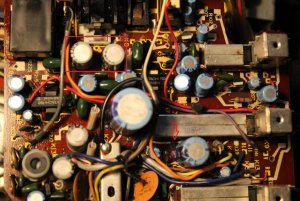
Main board. Empty arrow points to broken on board via, while replaced capacitors are within red rectangle.
Please excuse my typing mistakes.
There... Have a nice day!
Just to finish the story for today... After four hours of cramping over this GF-8080, my wife finally enters the room and says: "When you are going to finish my radio?" It turns out that she got it from her aunt about 25 years ago, when she was in college. Areal (antenna) was broken back then, as well as signal indicator, and tape deck. Now I have some more inspiration to repair this boombox!
After a lot of measuring, finally the culprit was found: bad on-board via. This unit has printed resistors and vias on the component side of the board! See the image below.
I just have finished the repairs, except the left loudspeaker (10 cm, 4ohm, 2W). The cone looks good, but the coil has infinite resistance. Does anybody know how to get it open without breaking the paper? If everything fails, I'll have to get a new one...
Finally, I have to clean the outside of the unit and get the new tuning knob.
Summary:
Time needed: one sunday
Failed parts:
- Elna electrolytic capacitors 1000uF 10V (2 pcs.),
- one red LED,
- one speaker 2W-4ohm-10cm
- one on-board via
Misc: Kontakt60 spray, celaning alcohol and soapy water
I have attached three images:
Dead speaker.
Knobs and failed parts, as listed above, plus one "new" 1000uF 10V capacitor, and a 3mm red LED from 1980's.
Main board. Empty arrow points to broken on board via, while replaced capacitors are within red rectangle.
Please excuse my typing mistakes.
There... Have a nice day!

Well, thanx, but that was not so special, just a lot of persistance, and some use of amper-volt-ohm meter... I must admit, I was desperate and used my handy-amp to test for signals at one time, but I did not even need my scope for this nice boombox.
I see that you like this, so I am going to post some more images of my attempt to restore the speaker. Due to the blown (shorted, leaky, whatever you wann call it) separation capacitor on the left channel power amp, there was a DC voltage of about 5V over a 4 ohm speaker. This is very bad thing, as TBA810S amp can easily push over 1A of current through the speaker, without blowing a fuse or destroying itself. In fact, there should have been 1A fuse in powe supply, but someone have put 2A fuse, probably since the 1A was blowing out because the amp was killing the speaker.
There is now help in crying now, the speaker is dead - the coil had overheated and probably melted.
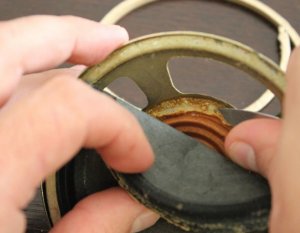
Now, there is no nice way to un-glue the membrane of the speaker easily. I have tried several alcohols, even a polystyrene solvent, and solvent for "gluing" the plastic models, but this 1977 glue is tough. It would not budge.... and you know what that means:

First, you have to take a (kitchen) knife with slightly curved, but pointy blade. I do prefer not too Sharp (pun intended) blade, but people get by a scalpel or "ecto knife". Much too sharp for my fingers, but consider yourself warned!
Remove the paper distancer from the edge of the speaker. Do not forget to unsolder the wires from contacts to paper membrane.
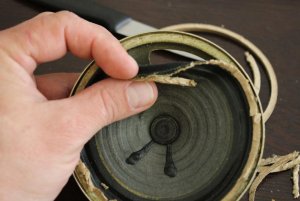
The goal is to scrape the glue under the paper membrane of the speaker. DO NOT RUSH! Haste knife work will result in cuts on the membrane or your fingers.
After whole membrane is detached, now remove the excess glue from the lower centering ring. Be careful not to cut your fingers, the speaker is not so precious.

Slowly use the knife to remove the glue and let the tip of the blade go under the membrane...
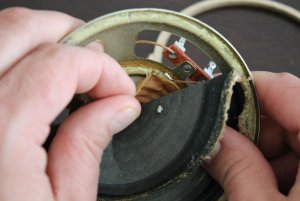
If the glue is sufficiently scraped, you could even remove the membrane just by tugging it. Be careful.
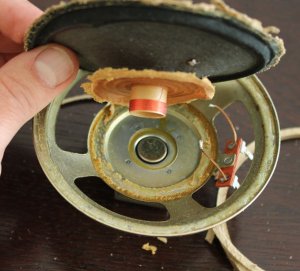
If you have been patient enough, and worked slowly, both the spekaer membrane and lower centering membrane are detached, while your hands remind cut-free.
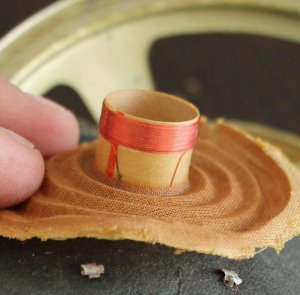
Finally, the part of blown wire is nicely shown. You have reached first part of the speaker repair process. I will try to repair the wire, but...
My problems are just starting here. I doubt that I can get this kind of wire. Rewinding the speaker coil is not such a great problem, but since the gap between the magnets is very tight the coil HAS TO BE the same thickness and smooth. There is no space for re-soldering this wire. Did you know that the field strength of such small speaker can easily be in range of 3 - 4 Tesla? Small gap makes such strong fields possible even with small magnets.
Please let me know if you know of better way to repair old speakers, or you have noticed any error in my ways (besides wasting my time on old junk, of course") ).
).
Stay Sharp!
I see that you like this, so I am going to post some more images of my attempt to restore the speaker. Due to the blown (shorted, leaky, whatever you wann call it) separation capacitor on the left channel power amp, there was a DC voltage of about 5V over a 4 ohm speaker. This is very bad thing, as TBA810S amp can easily push over 1A of current through the speaker, without blowing a fuse or destroying itself. In fact, there should have been 1A fuse in powe supply, but someone have put 2A fuse, probably since the 1A was blowing out because the amp was killing the speaker.
There is now help in crying now, the speaker is dead - the coil had overheated and probably melted.
Now, there is no nice way to un-glue the membrane of the speaker easily. I have tried several alcohols, even a polystyrene solvent, and solvent for "gluing" the plastic models, but this 1977 glue is tough. It would not budge.... and you know what that means:
First, you have to take a (kitchen) knife with slightly curved, but pointy blade. I do prefer not too Sharp (pun intended) blade, but people get by a scalpel or "ecto knife". Much too sharp for my fingers, but consider yourself warned!
Remove the paper distancer from the edge of the speaker. Do not forget to unsolder the wires from contacts to paper membrane.
The goal is to scrape the glue under the paper membrane of the speaker. DO NOT RUSH! Haste knife work will result in cuts on the membrane or your fingers.
After whole membrane is detached, now remove the excess glue from the lower centering ring. Be careful not to cut your fingers, the speaker is not so precious.
Slowly use the knife to remove the glue and let the tip of the blade go under the membrane...
If the glue is sufficiently scraped, you could even remove the membrane just by tugging it. Be careful.
If you have been patient enough, and worked slowly, both the spekaer membrane and lower centering membrane are detached, while your hands remind cut-free.
Finally, the part of blown wire is nicely shown. You have reached first part of the speaker repair process. I will try to repair the wire, but...
My problems are just starting here. I doubt that I can get this kind of wire. Rewinding the speaker coil is not such a great problem, but since the gap between the magnets is very tight the coil HAS TO BE the same thickness and smooth. There is no space for re-soldering this wire. Did you know that the field strength of such small speaker can easily be in range of 3 - 4 Tesla? Small gap makes such strong fields possible even with small magnets.
Please let me know if you know of better way to repair old speakers, or you have noticed any error in my ways (besides wasting my time on old junk, of course
).Stay Sharp!
Update:
After I have cleansed the outside and inside of the unit, repaired most of it and tried to reassemble GF-8080, she developed "deaf tuner" condition. After some grief, I relaised there is a bad connection somewhere on the tuner. Initially the tuner board was loosly screwed inside, and I could not see why, but when I fastened the screws tightly, the tuner went deaf. Simply felxing the board produced much lower signal, and everything was fine in "relaxed state". After much of resoldering, I realised thet the culprit was probably some bad connection on thorugh vias or vias printerd on the component side of the board near to the uPC585 stereo reciever-decoder. Since there is no nice way of resolving it, I have placed one part of rubber under the board to keep it in "good tuner" position. Kinda ugly hack, but it works better than initial solution (to keep the board loose inside her).
Now I she was ready for test... Radio is ok, speakers are fine, the tape plays... badly. The belts are a bit lose, but the audio (tape) head has a nasty crack in the middle. I guess I have to order a new one. NOS tape head can be found on ebay.
Does anybody have any suggestion whet head to order or is it all the same?
I found another "bug" in my GF-8080.
At first I did not pay much attention to problems she had 25 years ago, but the i assembled her, and guess what? Radio went deaf... seriously deaf.
After I took it apart again, I had to re-solder all connections in the tuner, but it did not help. Video shows the problem:
https://youtu.be/XVN2Azjn8eY
Well, my GF-8080 is missing battery compartment cover, and my kids suggested we make a 3D model and print one.
There is the first version:
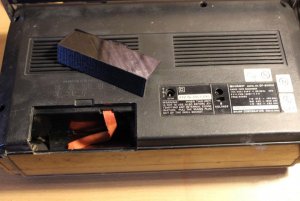
I guess I need to extend the length of it by about 2 mm, and lower the lip by 3mm. Also there is the question of the lip - how does it look like?W What is the thickness of the lip? What is the angle of the skirt? I guess I'll have to print several of them until I get everything right.
I would appreciate if someone will send me the images of this cover, so I can make a "replica". Thank you.
There is the first version:
I guess I need to extend the length of it by about 2 mm, and lower the lip by 3mm. Also there is the question of the lip - how does it look like?W What is the thickness of the lip? What is the angle of the skirt? I guess I'll have to print several of them until I get everything right.
I would appreciate if someone will send me the images of this cover, so I can make a "replica". Thank you.
Oh, and I have finally replaced audio head. There is no way (for me) to get the original. I mean, you should probably get the same one, but I guess this 40 year old gal will not mind. Works rather good with new one.
No wonder I could not get the azimuth right on the old one:

The belts are also replaced, and with this new audio head, my GF-8080 is left to only four bad parts:
- tuning knob
- battery compartment door
- levers for Mode and Function switches.
... anybody seen these?
No wonder I could not get the azimuth right on the old one:
The belts are also replaced, and with this new audio head, my GF-8080 is left to only four bad parts:
- tuning knob
- battery compartment door
- levers for Mode and Function switches.
... anybody seen these?
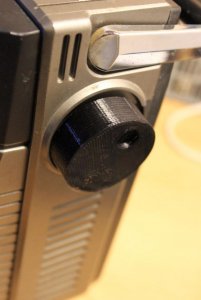
My daughter had some free time so she made a model of tuning knob for GF-8080.
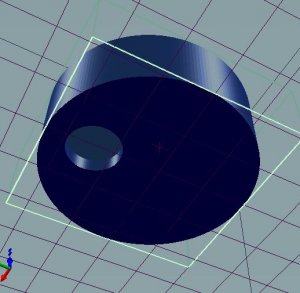
There are my first two takes at this knob:
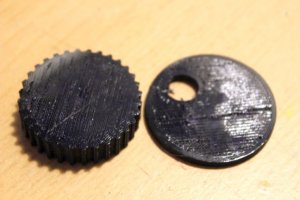
It still does not look exactly like the original, but it is rather similar.
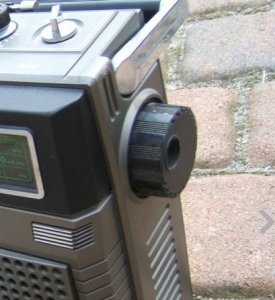
I wonder if there is the way to post the model file in this forum? No? Shall I put it somewhere else? We'll see.
... and there it is:
There are my first two takes at this knob:
It still does not look exactly like the original, but it is rather similar.
I wonder if there is the way to post the model file in this forum? No? Shall I put it somewhere else? We'll see.
... and there it is:
- Status
- Not open for further replies.