Sharp GF-555 restoration

Status
Not open for further replies.

crazygamer

Member (SA)
Jul 31, 2015
440
1
18
26
Estonia, Tallinn
Hello,

Today i acquired a nice piece like this, it was in sorry state, many scratches and it has seen better days, play on cassette decks don´t work as idler wheel has turned into a goo, ON-OFF tumbler switch also doesn´t work, everything goes ON from the moment you plug it to the mains, when it´s all plugged in, tumbler switch does nothing, doesn´t go from OFF to ON at all. :no: It has 2 wires soldered on but i´m not sure if it´s connected correctly. It has 3 legs, top one is not connected, red one on bottom and black one in the middle, i really don´t know if it´s correctly done by previous owner in the past. :huh: Maybe someone here can help me with that ?

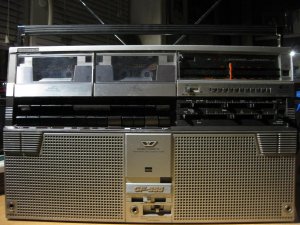
Anyway, overall is nice, some pictures also about the work.

IMG_3126.JPG
IMG_3128.JPG
IMG_3131.JPG
IMG_3150.JPG
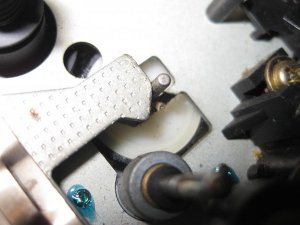
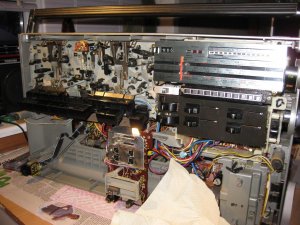
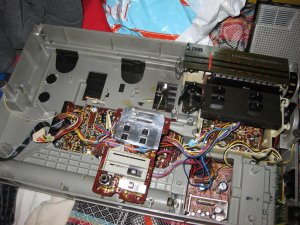
That´s the source of a problem :thumbsdown:
IMG_3154.JPG
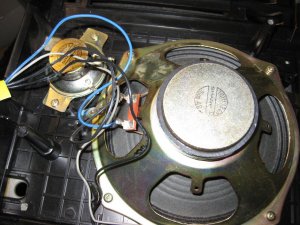
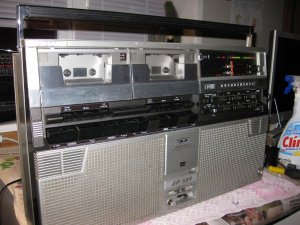
Those speakers ain´t playing around :-D
IMG_3156.JPG
IMG_3166.JPG
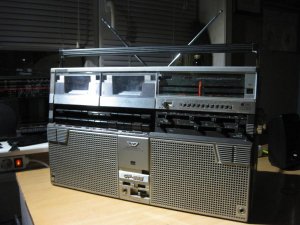
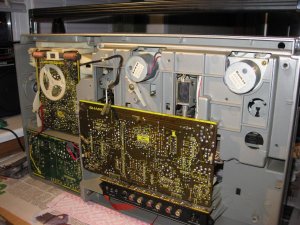
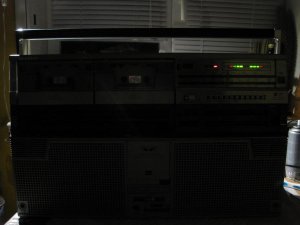
A really solid piece here
IMG_3171.JPG

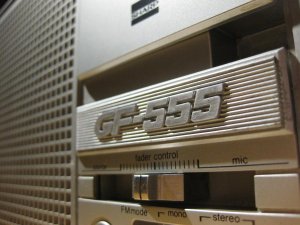
Any help with the function switch ? I know it must be easy, but googling it doesn´t help me out at all. So i´ll hope that almighty Boomboxery community helps me out. :lol:
IMG_3167.JPG

Thanks for attention !
 

Attachments

blu_fuz

Moderator
Staff member
Jun 3, 2009
10,669
166
63
40
WI
Those speakers do look beefy for that radio. How do these sound? Compare to anything?
 

crazygamer

Member (SA)
Jul 31, 2015
440
1
18
26
Estonia, Tallinn
blu_fuz said:
Those speakers do look beefy for that radio. How do these sound? Compare to anything?
They sure are nice, they sound good with acceptable bass, about comparing,I´ve never heard higher end boomboxes played alive myself but hmm,like a pumped up GF-6060, but with more bass, it has bass and treble controls that really work out fine,GF-6060 lacks them. I heard somewhere that GF-555 is world´s first double radio cassette, is it correct ? I highly doubt but you never know. It´s cassette deck sure is a beast, weighs even more than my Toshiba RT-6015 :lol:
 

crazygamer

Member (SA)
Jul 31, 2015
440
1
18
26
Estonia, Tallinn
MyOhMy said:
Good catch! It actually look quite good in the photographs, certainly worth a bit of effort to restore it. :yes: :thumbsup:
Thanks, yes it is, i also love it. It has some spots where it doesn´t look best, but overall is nice, nothing is missing, even aerials are intact. I only wish that i could get this switch alright, can someone help me with that ON-OFF Tumbler switch ? Are wires placed correctly of not ? What might be the cause ?
 

jimmyjimmy19702010

Member (SA)
May 5, 2012
3,578
26
38
Sunny Brisbane, Australia
Those on/off switches are known to fail in the on position resulting in the situation you have there where you can't turn it off.

The decks are amazingly heavy and well made - certainly the most robust decks I've seen in a Sharp. These were commercial machines designed for heavy use. The sound quality is acceptable but a little bass shy compared with the GF-9494, 9696 etc.

There is also another version of this box that's AC only!

James.... :-)
 

crazygamer

Member (SA)
Jul 31, 2015
440
1
18
26
Estonia, Tallinn
jimmyjimmy19702010 said:
Those on/off switches are known to fail in the on position resulting in the situation you have there where you can't turn it off.

The decks are amazingly heavy and well made - certainly the most robust decks I've seen in a Sharp. These were commercial machines designed for heavy use. The sound quality is acceptable but a little bass shy compared with the GF-9494, 9696 etc.

There is also another version of this box that's AC only!

James.... :-)
Oh, i see. I guess myself that someone has bypassed the switch, my electronics teacher recommended to put one wire from left to right as on 3-pin tumblers one wire always should be in the middle and one in the left/right. If i can´t access it, then i´ll take it to school and then he´ll take a look of it. :yes:

Deck is the heaviest thing on it, it´s robust, heavy, but sadly mine doesn´t work as it should. :thumbsdown: :sad: 
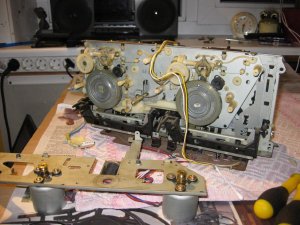
Idler wheel has degraded and one solution is getting new deck for it. I saw one eBay listing, but there you have to take the whole thing. Maybe someone here has a deck for it that has non-degraded idler wheels ? Or is there a solution to access the idler wheel ? :hmmm:

This is AC/DC version, battery compartment, for my surprise, is good as new. :lol: :thumbsup:
 

crazygamer

Member (SA)
Jul 31, 2015
440
1
18
26
Estonia, Tallinn
Tomorrow this box is going to a radio service, is getting a nice fix there, new idler wheels and i hope they can get this Switch thing also fixed well. I hope the best ! :lol: :thumbsup: :w00t:
 

crazygamer

Member (SA)
Jul 31, 2015
440
1
18
26
Estonia, Tallinn
Van Prensence said:
ah you have 1 of these now to. its a beast. i need to do this to my 555 eventually. decks dont work. but mostly in good condition to.
Yes, it was a really good find, something superawesome compared to my lower-end items. it has really well built deck and mechanics, APLD and glorious sound. Bass is bit shy, but maybe i hope just too much. :lol: Mine does have some paint damage here and there, it doesn´t look new at all, but it has all those silver coverings that are mostly gone.Mine are all intact. :yes:
 

crazygamer

Member (SA)
Jul 31, 2015
440
1
18
26
Estonia, Tallinn
ralrein1 said:
Very nice to hear that your Sharp is getting a tune up.Let us know how it turns out.
Well, yesterday i took it to doctor,

today they called me with only bad news. I let them replace idler wheels as they turn into goo very often and also work out this power problem, the ON-OFF switch didn´t work at all.

And news were that they weren´t able to fix this up, they can´t replace idler wheels as "they are one part". Hell no, idler wheels consist of plastic wheel and rubber ring on it, but they couldn´t do it. What the fark, really ? :huh: I guess i´ll rip it apart, this cassette part should turn into 3 pieces, i wonder how they couldn´t do it. But i´m not the one to judge them, they did what they did. :yes:

Any help here with those 2 idler wheels, how exactly do you access them and replace them ?
 

crazygamer

Member (SA)
Jul 31, 2015
440
1
18
26
Estonia, Tallinn
Edit:

Problem is not with the idler wheels but with capstan rubbers, i went there and took a look. Any ideas, how to replicate it, what to use, how to disassemble the whole deck ? I read something about it, but not much information though. Someone used silicone tubes but what size and how i should crack it open ?

Thanks in advance, i hope you can help me with that.
 

jimmyjimmy19702010

Member (SA)
May 5, 2012
3,578
26
38
Sunny Brisbane, Australia
You need a piece of tubing with an outer diameter (OD) of 5mm and an inner diameter (ID) of 2mm. A lot of 5mm tubing has a 3mm ID and as such, won't grip the capstan as well as 2mm ID tubing. You also need tubing that will be hard wearing enough to survive contact with the idler wheel.

I usually cut a piece around 5mm long. You need enough length to ensure a solid contact but not too longer piece that will make contact with the surrounding surfaces.

These instructions apply to GF-9191 - GF-9696 series of decks. They can also be used for the GF-515 - GF-555 decks although there are slight differences.The way the tubing works is identical to all decks.

You just need to do the following to remove/replace the tubing:

1. Remove deck.
2. Flip over and remove the rear metal panel. Remove flywheel drive belt.
3. Grab hold of the flywheel and pull out the capstan. Watch out for the tape counter pulley on the front that will slide off the capstan in the process. Also ensure you don't loose the little flywheel bush. It often stays in place on top of the bearing housing.

4. Flip the deck over and clean out any remaining sticky, black goop within the bearing housing.
5. Place your new tubing into the casing cavity and with the bush back in place, slide the flywheel and capstan in from behind into the casing. The tubing will slide on to the capstan - you will need some slight force to get it into place.
6. When the capstan has been slid 3/4ths in, place a little machine oil onto the rear bearing. (You need to have the capstan almost fully in place to ensure any oil applied to the rear bearing does no migrate onto the rubber tubing).
7. Push the flywheel fully into position.
8. Ensure the tubing is making absolutely no contact with any surrounding surfaces. You may need to gently slide the capstan back and forth a little to get the tubing in the correct position within the cavity. Check the tyre is making good contact with the tubing before moving on.
9. With the deck laying on its back, place a drop or two of machine oil onto the front bearing. Let the oil soak back into the bearing for a few seconds and then remove all excess oil with alcohol.
10. Flip the deck back on its face again, replace flywheel drive belt and then replace the rear metal cover ensuring the earth wires etc are reattached.
11. Slide the small, white tape counter pulley back onto the shaft ensuring you allow a 0.5mm gap to ensure no drag is caused.

These are the basic instructions - cleaning of extra parts and other small details have been skipped to simplify these instructions.

That's it - I must of serviced over a dozen of these decks with zero problems.

Good luck, take your time and you'll get it working.

James.... :-)
 

crazygamer

Member (SA)
Jul 31, 2015
440
1
18
26
Estonia, Tallinn
Thanks !!!!!!!!!!!!! :w00t: :lol: That´s a lot of use now, i can´t thank you enough ! :bow: :thumbsup: But how do i clean the capstan bearing from this black goo ? Do i have to take it apart too or it comes out with flywheel ? And this tube should be fitted on capstan loosely or tightly ?

I´ll get back to it when i get my GF-555 back from repair shop. :yes:

Thanks for help James !!!!!
 

jimmyjimmy19702010

Member (SA)
May 5, 2012
3,578
26
38
Sunny Brisbane, Australia
You just need to use cotton tips dipped in alchol to remove the black goop. I also push the capstan through to push any debts that's deep inside.

The goop won't be inside the bearings. It will only be in the cavity inbetween. It takes a while but you can get it all out without removing the bearing carrier.

The tube must be a tight fit on the capstan. Remember, that little piece of tube has to turn the tape whilst in play mode!! A loose piece of tubing won't be doing anything but sliding on the capstan!! :-)

Here is where I got my tubing: Look for this item number: V0205
http://www.silicone-tubing.com.au/viton_tubing.htm

View attachment 25091

The quality of this tubing is high tech, medical grade so is much better quality than the stuff Sharp would have used in 1980. The minimum quantity to order is 1 meter - not cheap but if you plan on doing other Sharp decks in the future, it may be a wise investment.
 
Status
Not open for further replies.