Realistic SCR-8 no sound

Status
Not open for further replies.

docs

Member (SA)
Jun 26, 2010
2,558
381
83
52
United Kingdom
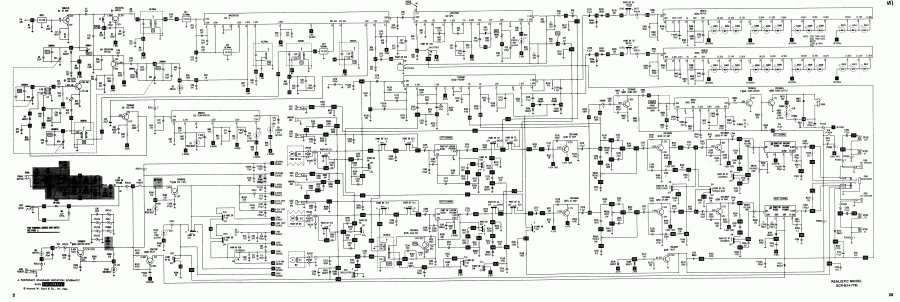
Was taking the Realistic out to the park and found there was no sound on it :(

Tested with batteries then with power, I can hear it very quiet in both channels but not normal volume, same on headphones.

Does anyone know this box well enough to identify what I need to look for specifically please ?

Incidentally, this box was working 100% perfectly, it has been sat in my bedroom a little while until today when I wanted to use it.

Any help appreicated.
 

docs

Member (SA)
Jun 26, 2010
2,558
381
83
52
United Kingdom
Yeh I've given them all a good contact clean but I don't notice any sound difference when I press any of the buttons or turn any of the pots.
It's pretty weird since it was all working not that long ago :(
 

docs

Member (SA)
Jun 26, 2010
2,558
381
83
52
United Kingdom
I can successfully inject audio onto the amplifier. The amp is HA1392 and I have sound coming out of both channels directly from the amp.
Should I be able to inject audio from the pre amp too ? The pre amp is a TA7658P.

Any suggestions welcome.
 

Superduper

Member (SA)
How did you inject a signal into the HA1392? Via pin 2 and 5?

Preamp TA7658P is not what you think. It is a preamp but for the purposes of the SCR-8, this chip behaves as a buffer amp to feed the meter drivers. Not for AF purposes. The only way I can see this chip contributing to the problem is if it is shorting the audio signal to ground. If you think that is the problem, verify by checking to see if pins 6 and 9 are shorted to ground, or remove the solder and check the machine to see if audio is restored. The actual preamps for both channels are discrete transistors Q101, 102, 103, and Q201, 202, 203 respectively. Since I simply don't see transistors for both channels failing simultaneously, the problem likely lies elsewhere. Is your machine able to playback through the line-in?

I think you should consider doing some voltage checks. Your machine might be low in power due to poor connections at the power rails.
Also, check and clean the record/playback (record-bar) switch.
 

docs

Member (SA)
Jun 26, 2010
2,558
381
83
52
United Kingdom
Thanks Superduper, I'll double check the record arm, I've sprayed it and levered it to and fro to try and give it some work.

I injected sound in on pins 2 and 5 as you say without any problem.

There is only very quiet audio on any function, and it is the same on headphones.

I'm not sure where to check voltages Norm since I'm a noob trying to learn electronics.
I'm also not sure how to check the power to the rails.

Though the tape deck will FF/REW etc with full vigour and it does play, just really quiet.

Would pics help to point out these things ?
 

Superduper

Member (SA)
You understand where I'm going and the logic behind why I discount the preamp transistors right? If you are having low output on both channels, then the problem is most likely common to both the left and right channels. Transistor failure is not uncommon. But having 2 or more fail on separate channels in exactly the same way is not likely. Furthermore, there are no capacitors that are common to both the left and right channels except the filter capacitor at the power supply. Strike that -- there is also a large 1000uf capacitor at the positive amp rail -- if that cap has failed short or excessively leaking it might cause a low voltage situation at the amp but will show up with a voltage check.

Anyhow, the SCR-8 is pretty simple in that the signal path does not take many circuitous paths. Rather, it goes from signal source (line-in, tape, radio) through the record/playback switch, the function selector, then on to the preamp transistors (Q101, 102, 103 AND Q201, 202, 203 for the other channel). From there, the signal goes through the tonal controls and on to the amp. I believe there is also another preamp chip (LA3160) but that would be for either the tape or phono and since you are having issues in all functions, we can safely assume that chip is OK.

I understand that you've injected an audio signal and heard it at the speakers. But unless you know the signal strength that was injected, that doesn't tell us whether the amp is working properly. The amp might be working but could be weak. Injecting a higher than normal signal will result in louder audio at the speakers. But if you are injecting a much stronger than normal line signal, then the amplifier is not providing enough amplification. Once again, could this be due to low system voltage?

HA1392 receives Vcc at Pins 10, and grounded via pin 9 and at the tab. Check that pin 10 is receiving full system voltage and that pin 9 and tab has good ground connection with ohmmeter. If the pin density is too close for you to feel comfortable probing there -- then follow the pin path until density opens up a bit. However, if you don't probe the pins directly, you won't know if there is a cold solder joint, just fyi.
 

docs

Member (SA)
Jun 26, 2010
2,558
381
83
52
United Kingdom
Thanks again.

I certainly do understand the logic. Several resistors failing at once would be unlikely which is why we can move on from that quickly as you say.
I do see the large cap on the power board and another smaller but reasonably sized cap close to where the power comes onto the main PCB, both visibly look to be okay without any bulging or leaking taking place.

I know what you mean about the injection. I use a standard volume controllable input that I put together from a kit, precisely for audio input and fault diagnoistic purposes. I remember it did say what the input level was but I'm afraid i can't remember now. Though I do think that the input is not really high and is realiable.

I can check the Voltage on the amp on those pins I think, though my ignorance dictates that I do not know what outcome it should be, let me check... while holding negative to the negative of the power line to the PCB and checking positive on the pos of the same cable it reads 17.4v and moving the positivie to pin 10 on the amp chip it reads the exact same voltage.

By the way sorry for being a noob, I realise how frustrating it must be for you trying to explain things.
 

docs

Member (SA)
Jun 26, 2010
2,558
381
83
52
United Kingdom
The 2200uf cap on the power board.


A 2200uf and 2x1500uf caps right next to where the power cable connects to the power board. The red box I drew on indicates the power cable.


The only 1000uf's I could find are in the picture below. They are both placed close to the recording arm.


Superduper

Member (SA)
Tell you what. Try this:

(1) Take another boombox and set it to line-in.
(2) Turn the volume up to max
(3) Using your signal injector, inject a signal into the known good boombox through the line-in.
(4) Adjust the signal level so that you get moderate volume from it (loud but not so loud that it annoys you enough to want to turn it off).
THEN
(5) Without changing the outputted signal level of your signal injector, INJECT a signal into your SCR-8 at the HA1392.

Do you get similar volume at the speakers at the SCR-8 as you observed with the other boombox? If yes, then your amp is good and you can look at other causes. If the volume is not as loud as the other boombox using the same injected signal strength, then suspect bad amp module.
 

docs

Member (SA)
Jun 26, 2010
2,558
381
83
52
United Kingdom
I definitely get similar output volume wise from the injector. An extremely loud beep (thats all it does), so I turned it to a reasonable volume on each stereo so as not to deafen me and the neighbours :)
I just tested it on my philips d8614 aux.
 

Superduper

Member (SA)
Well, that sounds like the amp is working fine. Tell you what, why don't you try injecting a lower level signal at the preamp chip pins 6 and 9, and see if you can get a nice fat beep at the speakers. You should be able to get the same loud beep with far lower signal level than when injected at the HA1392.

You have the process down correct. Basically, you work backwards until you find the problem area. Each successive stage prior should require lower injection signal level. I have a schematic that will be very helpful for you but unfortunately, I tried photographing and scanning but got poor results, and I really did not want to photoshop stitch 4 pages together (it's like 30" long). It's from an original Sams Photofacts service manual. I'll try again later to see if I can scan it at my office scanner. My normal workhorse is connected to a computer whose hard drive failed recently (smart hdd pata, which is hard to find nowadays) so I have not been able to do any scanning since.
 

docs

Member (SA)
Jun 26, 2010
2,558
381
83
52
United Kingdom
Ok, I tried using the same audio injector on the TA7658P chip pins 6 and 9 and I can hear it but it is very quiet, just like the audio is very quiet on any function.

Thanks for trying to get a copy of the service manual for me I really appreciate that and your help.

Unfortunately the audio injector I have can not be changed to produce lower frequency if that is what I need to do.
 

docs

Member (SA)
Jun 26, 2010
2,558
381
83
52
United Kingdom
Hehe sorry, Norm is very kindly sending me a schematic to help me troubleshoot and to isolate the problem and to hopefully restore this beauty.

AS soon as I receive them I'll send an update :)
 

Superduper

Member (SA)
Ok. For you guys that want to follow along as we troubleshoot this SCR-8 via PM.

Here is the image of the schematic for reference:

Hopefully, it does not get resized. If it does, maybe you can click on it to enlarge.


OK. It did get resized. So Fatdog will need to get this into this archives.
 

Superduper

Member (SA)
Here was the fix:

superduper said:
Hey Dave.

If you are getting 50k ohm impedance on that circuit, that's good and not gonna drag down the signal going to the amp.

I'm gonna mail this out and so when you get it, just follow the signal from beginning to end. Sam's Photofact schematics are good because points all along the schematic are numbered. So if you need help, you can just tell me the numbered point and I can refer to it easily.

As to the signal tracer device: Just remember that as you trace backwards, the signal should get smaller since there is more amplification further downstream (if the amps are working properly). In other words, the same signal injected at the collector of a transistor amp should produce a smaller sound at the speaker than the same signal injected at the base of that transistor.

One lead is affixed to system ground. The other lead is probed at various locations along the signal path. Work in one direction only. I highlighted the path from the amp back to the function selector. If you follow the circuit even further back, you will see that the simplest path is to go to the aux-in. I presume you already tried line-in and got the same results? If all functions are the same, then I presume that the issue is from the function selector on. When you probe, for example at both sides of a capacitor -- you should get a signal to pass. If the amp receives the signal at the downstream leg of the cap but no on the upstream leg -- then presume the cap has failed. When probing at the audio amps (transistors), signals injected at the base (upstream side) should produce significantly louder audio at the speakers than the same strength signal injected at the collector or emitter (depending upon the system design) since the transistor, if working properly, will amplify the signal. So as you work your way back from amp to amp, the signal strength injected should get progressively smaller to produce satisfactory audio at the speakers. If it does not -- then there is a problem in that circuit you need to do a VR analysis of the components adjacent to that transistor, the specs of which are listed in the schematic (voltage-resistance analysis). That is how to trace amp issues, in a nutshell.
------------------

docs said:
Hi Norm,

The letter arrived today (thanks so much) and I've been delving into it to try and see if i can suss it out.

I haven't done any voltage readings yet but i'm trying to suss out the audio injection.

I have begun at the amp chip and moved back along the cable to the volume (VR103) which has 2 rows of four pins. The two pins that connect directly back to the amp give good sound, the same as the amp. The two pins that connect to the caps C144 and C244 have a significantly reduced volume (it is not as low as the problem but it is a lot lower than from amp and volume pins) which can also be seen when I move back to C144 and C244 caps, the audio is also significantly lower. So as expected when I move back to the pins connected to those caps on the amps Q103 and Q203 I get the similar lower audio.
However I get no audio at all on either of the other pins on Q103 and Q203. So trying the pins that go back to caps C142 and C242 there is no audio and ofcourse moving back to those caps gives no audio either.

I guess I need to try and voltage check which I will try and do now...

Hmm, I checked the voltage with the setting on 2v at the pins on the amps q103 and q203 but only get a reading of .050 on both at the pins connected to caps c144 and c244. Also the pins going on to c142 and c242 are only reading .025. According to the schematic they should be 1.60v and .63v so I hope I am testing it correctly.

I also went back to q102 and q202 with what appears to be similar low voltage results.

But going back to q101 and q201 I do get much closer voltage readings to those on the schematic for these amps.

I think I'm in over my head :(
------------------------------

superduper said:
Actually Docs, you are much closer to isolating the issue than you think. You just don't know it yet. Great troubleshooting by the way. I wish all my troubleshooting was as clear and text-book like yours.

Anyhow, you should expect to hear some attentuation of the signal from the volume control since the purpose of the volume pot is to attentuate the signal. Remember, I told you to turn the volume all the way up to max? Did you do that?

Anyhow, the fact that Q 103/203 amps produced no amplification is telling. Then you followed my instructions to the letter by beginning the VR analysis. By observing that the collector pins of those amps are only receiving .50 volts then that is a problem since that is the power line. The pins that go to C142/C242 are the control lines and receives the audio signal to be amplified. The .25 volts is not a problem per se. But transistors require approximately .7 volts just to turn on, hence the need for "bias voltage". So where is the problem?

If you look at Q103/203 -- you will see TP4, which is the power supply line which supplies power to those amps. In the schematic, it doesn't look like it's connected to anything but in schematics, that is what we call a netline. In other words, instead of drawing lines all over the place -- a simple reference is indicated to show that any lines terminating with the same reference netline is connected together. For example, look at the row of LED's on the upper right of the schematic. You will see they all terminate at netline #1. That simply means all those are connected together. So going back to netline #4 -- if you look towards the right of the Power Supply (left side of schematic), you will see a row of power lines labeled different voltages. Netline #4 is supposed to provide 4.05 volts at that rail. Q102/Q202 is likewise powered by the same power rail (#4) so not suprising that you got the same problem. But if you go all the way back to Q101/Q201 -- that amp is powered by power rail #3, which is a different rail.

So in conclusion -- there is a problem at that power rail. Now, I don't know if there is a continuity problem somewhere along the line (can't tell from the schematic if it's a jumper wire or a trace on the PCB). Also if you look at power rail #4 near the power supply -- there is a 1000uf capacitor (C147). If that capacitor has excessive leakage or shorted to ground -- it could cause the low voltage condition too. And if that series resistor (R143) is failing and reading significantly more than 1000 ohms (1k), then that could also cause the low voltage condition.

Best way to test those two components.
Resistor: boombox powered OFF -- test resistance across both ends of R143. You should get approx 1kohms or slightly less.
Capacitor: boombox powered ON, test voltage at both ends -- should receive 4.05 at one pin, and zero at the other. If significant deviation -- then test voltage at R143 and report.
----------------------------------

docs said:
Thanks so much Norm for such clear instructions and many thanks for the support.

Now I understand what those numbers mean and what voltages to expect there, thanks for the explaination.

R143 resistence gives a .527 reading which i think is 527 ohms on one side but only .009 on the other end.
C147 capacitor only gives .053 on one side and .004 on the other. (I had to reduce the testing setting to 2 to get an accurate reading).
R143 voltage gives 8.09 on one side and lo and behold only .053 on the other !

Do we have a result ?! By the looks of it to me this resistor is not working as it should possibly ? I still doubt my findings lol

BTW I am testing these with everything connected, all tape deck wires and speaker wires as though it would be if closed up.

I tested the voltages by using a ground and then a different ground and get the same result.
---------------------------------

superduper said:
Not sure what you are measuring but resistance of the resistor should be measured between the two leads, not to ground. You only measure using ground as a reference when measuring voltage. As for the measurment of the capacitor -- once again, what you you measuring and how are you measuring? Please recheck and advise.

When measuring resistance of a resistor, position probes at both ends of the component. Please check the capacitor and resistor both again. Also, I can't tell what .527 means. It depends upon your meter and what scale you are on. For example, at the 200 ohm scale, it probably means less than 1 ohm. If you are using the 20m ohm scale, that could mean 527k ohm. Anyhow, right now, we need to clarify if you are testing against each lead or against ground.

It does sound like either the resistor or capacitor is bad, but I'd want you to recheck your findings first so we can be sure what you are reading is correct and measured properly.
--------------------------------

docs said:
Ok, sorry about that.

Checking the resistor with power off and the meter on 2k setting and probes directly on either side of it, gives 467ohms.

With power on:-
The voltage to ground on the cap with the setting on 2 reads 004 on one side and 053 on the other.

The voltage to ground on the resistor with the setting on 20 reads 0.04 on one side and 8.03 on the other.

I think thats right now, sorry about that.
------------------------------

superduper said:
Check the resistance of the capacitor. It sounds like it's shorted to ground. That resistor should be 1K ohm. It is not uncommon,however, to see lower than expected resistance because current can take a circuitous path when components are tested in circuit.
-----------------------------

docs said:
Ok, checking the resistance of the C147 cap directly on both of its pins I put the setting to only 200ohms on the MM for accurate reading of 06.1.

I expected it to accumulate as it took charge but it does not continue.

As a result I checked a new cap the same way and got the expected result of it accumulating charge and continuing to infinity.

This result, with your comment that it looked as though it was faulty made me conclude that I should change it out.

So I changed the cap for the same 1000u but with a slightly higher voltage capability (thats all I had anyway)...

and the Realistic SCR-8 makes sound again, perfect just like it was new!!

:w00t: :w00t: :w00t: :w00t: :w00t: :w00t: :w00t:

Norm I can't thank you enough for your patience and helping a newbie like me to get this thing fixed again.
You're a true gent.

http://i233.photobucket.com/albums/ee53/docscil/Ghettoblasters/P1030714.jpg
 
Status
Not open for further replies.