My holiday project is to turn Ira's classic M90 with the diagonal stripe pattern, which had seen better days, into my Dreamblaster.
This is what I started with:

She'd had a hard life and the paint had really started to show how hard the life had been. Thing is this M90 sounds as good, if not better, than my near-mint one!
So she really needed some attention and for the last couple of months I'd been planning my ultimate idea of a custom blaster paint job for her. The M90 is often criticised for being very utilitarian in design and I wanted to take up the challenge to make her look as hot as she sounds.
This then became my, as they say in the videogame industry, target render for what I wanted her to become:
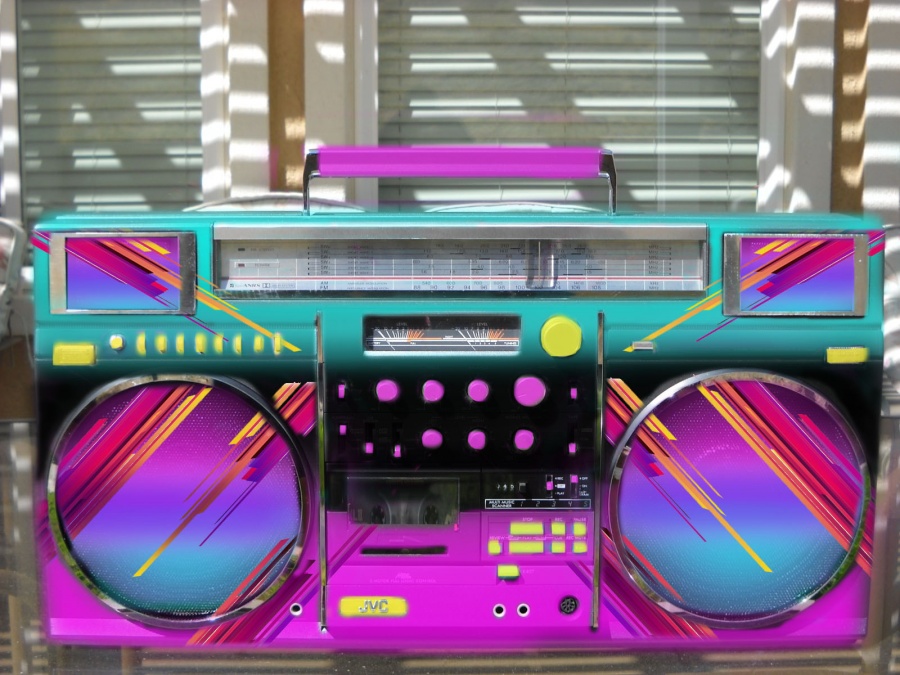
This design draws upon almost everything I love about 80s design. I wanted this to look like it could've been done in the 80s and was very careful about introducing any elements that would appear too modern. Colours were most important, and the the bright pink/magenta contrasted with the aqua/blue and black made this radio really POP! Adding some yellow details to compliment the stripe motif was the final part. The stripe motif was found on the internet and fitted exactly with what i had in mind. The colour cast of the original was changed to match better too.
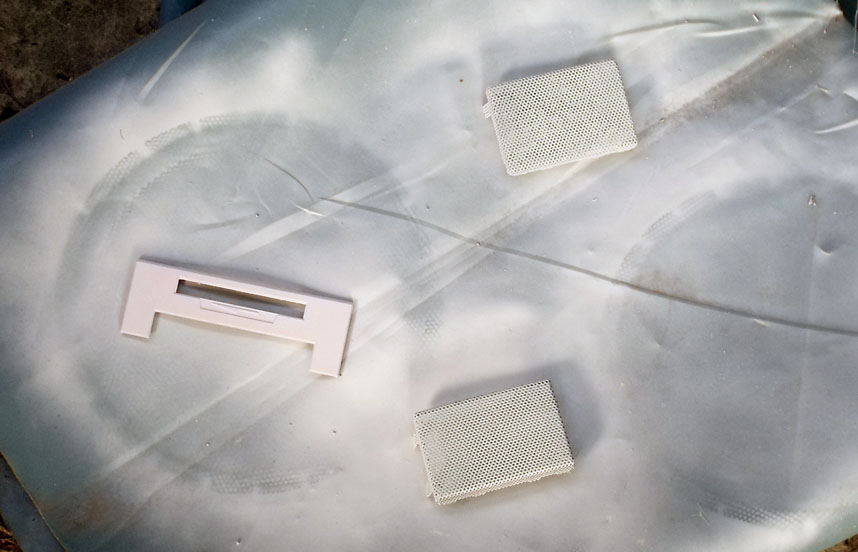
The idea was to paint her all and then get the striped patterns commercially printed. The only element missing from the photoshop is the text to go over all the controls. I've created these in Publisher at work (hard yards, let me tell you!) and will have these printed up as well, white text on black. This means the little panel about the cassette deck controls remain unchanged also.
So, it was off to work! Taking her completely apart was the first task. Much to my extreme happiness this was not as hard as I imagined! The M90 is almost enitrely built on an internal chassis and everything plugs in and out. Once the main chassis was removed, the speakers and other bits and pieces came out super easy. Next came lots of cleaning and my first ever drip tip!! She cleaned up nice after a good soaking and it showed me alot of other little imperfections I hadn't noticed before.
I spent many hours sanding her back. There was a lot of work here. I wasn't planning on fully removing the old paint job as some of it was still very intact, especailly the white around the speakers. The main problem areas were around the power and radio band panels. As evidenced below there was even more custom paint work hiding underneath a layer of poorly applied silver paint.


The next step was some undercoating action. I found out by accident that the pink paint I bought is very translucent. Even multiple coats would allow darker colours underneath to show through, so thoroughly undercoating everything white was going to be even more necessary than usual. Lots of work and two cans later everything was undercoated.

Super clean!!
I wanted to experiment with the speaker grills as I figured painting these was going to be the hardest. Two goes and two strip backs to bare metal got me this far, hopefully I've got it sussed!

The pink will be added to the top and then the purple stripe will be added last. I'm not looking forward to doing the tweeter grills.. smaller will mean much harder. That's for tomorrow though.
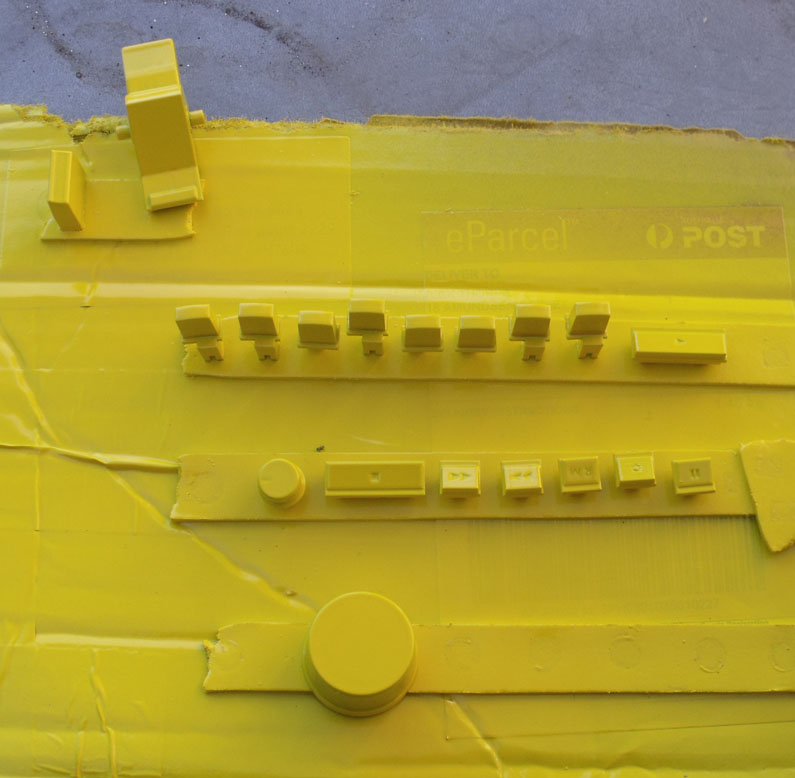
The buttons were all undercoated, sprayed and then finished with a stain topcoat and look rather nice.

Bold and bright!
The speakers on this particular radio were the worst condition I'd ever seen! Stained through environmental conditions as well as the over spray from when the speakers had been painted numerous times over the years. The surface was appalling. My intention was always to have bright yellow speakers and a few coats later they came up superhot!
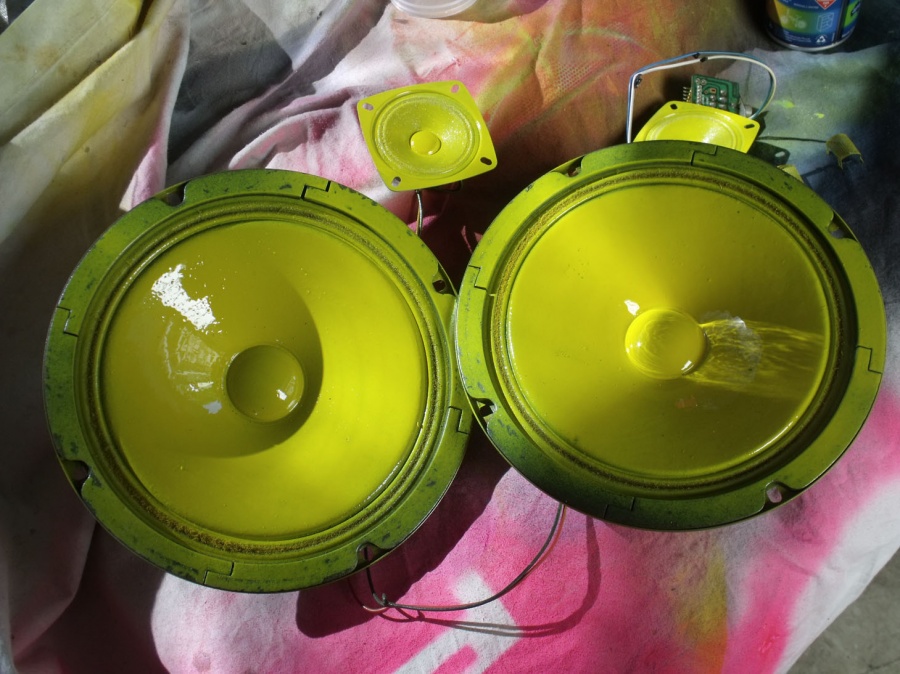
Shame they won't be very visible at all behind the grills, but at least I know they a hell of a lot more protected than they were.
That brings us up to the end of the second day of the project!
I'll keep posting every day theres news until she's done!! I'll have to wait for the stripe decals and text as all the printshops are closed down until Jan 10. So I'll see how far I get in the meantime!!
Rock On.
This is what I started with:
She'd had a hard life and the paint had really started to show how hard the life had been. Thing is this M90 sounds as good, if not better, than my near-mint one!
So she really needed some attention and for the last couple of months I'd been planning my ultimate idea of a custom blaster paint job for her. The M90 is often criticised for being very utilitarian in design and I wanted to take up the challenge to make her look as hot as she sounds.
This then became my, as they say in the videogame industry, target render for what I wanted her to become:
This design draws upon almost everything I love about 80s design. I wanted this to look like it could've been done in the 80s and was very careful about introducing any elements that would appear too modern. Colours were most important, and the the bright pink/magenta contrasted with the aqua/blue and black made this radio really POP! Adding some yellow details to compliment the stripe motif was the final part. The stripe motif was found on the internet and fitted exactly with what i had in mind. The colour cast of the original was changed to match better too.
The idea was to paint her all and then get the striped patterns commercially printed. The only element missing from the photoshop is the text to go over all the controls. I've created these in Publisher at work (hard yards, let me tell you!) and will have these printed up as well, white text on black. This means the little panel about the cassette deck controls remain unchanged also.
So, it was off to work! Taking her completely apart was the first task. Much to my extreme happiness this was not as hard as I imagined! The M90 is almost enitrely built on an internal chassis and everything plugs in and out. Once the main chassis was removed, the speakers and other bits and pieces came out super easy. Next came lots of cleaning and my first ever drip tip!! She cleaned up nice after a good soaking and it showed me alot of other little imperfections I hadn't noticed before.
I spent many hours sanding her back. There was a lot of work here. I wasn't planning on fully removing the old paint job as some of it was still very intact, especailly the white around the speakers. The main problem areas were around the power and radio band panels. As evidenced below there was even more custom paint work hiding underneath a layer of poorly applied silver paint.
The next step was some undercoating action. I found out by accident that the pink paint I bought is very translucent. Even multiple coats would allow darker colours underneath to show through, so thoroughly undercoating everything white was going to be even more necessary than usual. Lots of work and two cans later everything was undercoated.
Super clean!!
I wanted to experiment with the speaker grills as I figured painting these was going to be the hardest. Two goes and two strip backs to bare metal got me this far, hopefully I've got it sussed!
The pink will be added to the top and then the purple stripe will be added last. I'm not looking forward to doing the tweeter grills.. smaller will mean much harder. That's for tomorrow though.
The buttons were all undercoated, sprayed and then finished with a stain topcoat and look rather nice.
Bold and bright!
The speakers on this particular radio were the worst condition I'd ever seen! Stained through environmental conditions as well as the over spray from when the speakers had been painted numerous times over the years. The surface was appalling. My intention was always to have bright yellow speakers and a few coats later they came up superhot!
Shame they won't be very visible at all behind the grills, but at least I know they a hell of a lot more protected than they were.
That brings us up to the end of the second day of the project!
I'll keep posting every day theres news until she's done!! I'll have to wait for the stripe decals and text as all the printshops are closed down until Jan 10. So I'll see how far I get in the meantime!!
Rock On.


 What a fun looking project, it is already building good character. I'm interested in seeing how your lettering will turn out. take extra pics...


")


