Ferguson 3T09

jonny

Member (SA)
May 21, 2016
55
16
8
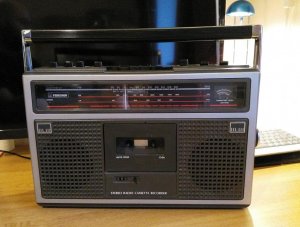
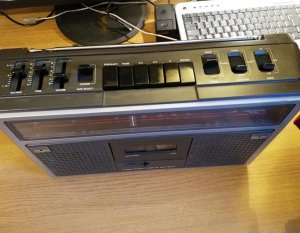
Just picked this old Ferguson 3T09 up from eBay, with a view to giving it a gentle restoration.

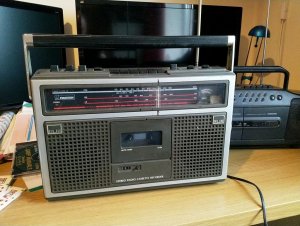
Bit of a back story to this; I was given one of these by my grandparents when I was maybe 7 or 8 years old, so around 1990ish, and just starting to develop an interest in music. The Ferguson was their old kitchen radio, which was passed on to me when they bought a new Sony to replace it. After a year or two the 3T09 developed some sort of fault, and in 1992, aged 9, I saved up my pocket money to buy a brand new Samsung twin tape machine (from Miller Brothers in Doncaster, if anyone remembers them!).

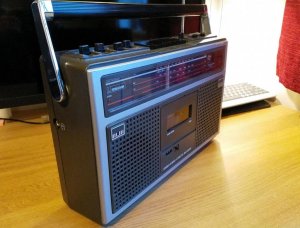
I still have the Samsung (it's lurking in the background of the photo), having found it in my parents' loft a few years back, thread on that here:

http://boomboxery.com/forum/index.php/topic/25170-dug-out-my-old-samsung-not-seen-it-for-over-20-years/#entry316410

Anyway, this particular 3T09 is fairly tidy and in working order, with a handful of issues which I'm hoping will be easy enough to fix. Will pop up some more details as I get in to stripping it down and cleaning/repairing it.
 

Attachments

jonny

Member (SA)
May 21, 2016
55
16
8
Just an update, having had the old Fergie to bits and given it a good clean and spruce-up.

The only remaining issue is that the tape drive belt has stretched to the point that it no longer drives the capstan; the design of the deck means that a belt replacement requires a complete strip-down of the mechanism, so that's been left for another day. Will try to find a Bluetooth tape adapter to check the heads are working in the meantime. I did take a cotton bud and some IPA and give the playback head a good clean while the machine was apart.

On the upside, the casing cleaned up pretty well. I think it had been kept in a kitchen at some point as the casing felt a little greasy and discoloured. To shift this and restore the original colour I used Farecla G3 Colour Restorer, followed by Auto Glym trim polish to bring back the sheen. The Perspex tuner dial and tape deck windows were cleaned using Auto Glym glass polish.

The switch and slider knobs, tuner knob and cassette push buttons all received a thorough clean and were polished with the same Farecla polish.

There's a scuff to the silver trim and a couple on the grey parts of the casing, which aren't going to be corrected with anything short of sanding down and painting, which I think would spoil the originality of the thing.

The tone and balance controls were very stiff, fortunately all that these needed was a decent dose of switch cleaner and some exercise to make them move freely and smoothly. The same treatment put paid to the crackling from the speakers when adjusting the volume control.

The function and band switches were initially a bit hit and miss; again a squirt of switch cleaner and a good wiggling did the trick. The stereo/mono/wide switch received the same treatment and as a result the stereo indicator now lights when it's tuned in on FM - bonus.

The foam infills that fit between the switches and the casing were beginning to crumble. They were covered over with black fabric tape, which both keeps them in one piece and is very similar in appearance to the original foam.

Finally, the chrome ends of the handle polished up beautifully.

Now all back together and I'm quite pleased with the way it turned out. It's not immaculate, but it's an original, clean and tidy radio. Still have the tape deck to fix, so for now it's limited to use as a radio only. Sounds decent enough for a 40 year old, relatively low-end system, and although it's a fairly plain design I really like the big, clear tuner dial and the very solid, heavy feel of the whole thing. And, of course, for me personally it's got immense nostalgia appeal!
 

Attachments

DPaignall

Member (SA)
Dec 8, 2019
133
37
28
That looks very smart, well done for getting it back so good!
Metalic pens and sharpies are great to touch up places where sanding down would be too drastic an option.
I use a steam cleaner that gets into all the nooks and crannies and blasts the dirt away - mopped up with a micro fibre cloth, it's very thorough, then a once over with baby wipes and a toothpick as a prodder for the tricky bits and car products for the finish.
Have fun disassembling the tape mechanism - always a bit daunting - but not as daunting as reassembly!
They don't make them like they used to!
 

jonny

Member (SA)
May 21, 2016
55
16
8
Cheers DPaignall, some good suggestions there.

I used an old electric toothbrush for the fiddly areas, which worked quite well.

Now trying to find a service manual for the 3T09, so that I can set about the tape mech with minimal risk of damaging it!