TRC-931 2nd. Edition Cap Help

secondhand

Member (SA)
Oct 17, 2019
3
0
0
Hey all, thanks for allowing me to join the forum. I have been restoring a 2nd gen 931 and unfortunately I have ran across a problem with some capacitors. Totally my fault I had everything laid out to replace these caps and "someone" moved everything on my bench and now I am lost. I have researched for a service manual and from all the posts I assume its not available.

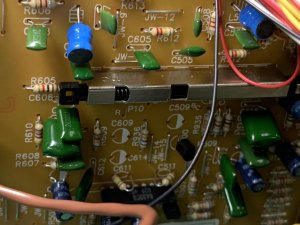
I was hoping maybe someone is doing a restore and can give me cap values on these locations.

C509
C514
C609
C614

I know they are 50V just don't want to make some mistakes in the values.

Thanks!

Frank
 

secondhand

Member (SA)
Oct 17, 2019
3
0
0
Hey Dave! Thanks for the reply. The board is the main amp/volume control board. I have enclosed a pic of the location, Thanks for anything you can provide!
 

Attachments

secondhand

Member (SA)
Oct 17, 2019
3
0
0
Thanks Superduper. I purchased and downloaded the schematic however quite a few components are not matching up with the unit I have. From my research i have the 2nd gen; one antennae, headphone jack above left speaker. Thanks again for any help!
 

Superduper

Member (SA)
C509/C609 would appear to be 0.47uf since both the schematic and Docs info seem to align. You should know that most of these models and their boards typically can be setup multiple ways. Lasonic came out with so many different versions, all with the same model numbers that it's impossible to know how it was set up. In fact, if you look at your PCB, the spots marked C511 and C611 suggests that capacitors are intended in those spots, yet those are clearly 2 resistors.

What I suggest is that you report back by looking at the underside of the board and find where the cap leads go to, especially if it connects to the adjacent preamp chip (BA3308). If you can figure that part out, then you can use the following circuit diagram to compare to.

Lastly, when it comes to capacitor replacement.... for ALL OF YOU GUYS OUT THERE.... do them one at a time. This isn't a race. Leave the old cap on the bench while you install the replacement. Once that is done, put the old one in a jar so that it won't be confused with the next one you remove and put on the bench. Why? Come on...

Screen Shot 2019-10-18 at 6.30.46 PM.png