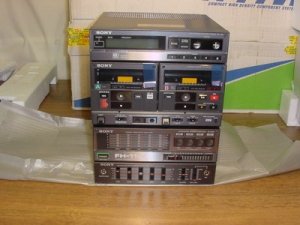
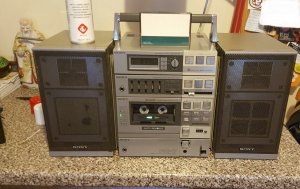
So i had a chance to grab a Sony FH7 a while back from Northerner, he was so reasonable price wise and i had bought from him before so jumped at the chance. It arrived last night, i fired it up and had a listen, wow good sound, solid bass and lots of clarity, that was just on radio with no stereo lock (or at least no light), line in sounds even better, so far , so impressive.
Whilst the box was cheap the reconstructive surgery on the hernia and slipped disks lifting it won't be, jeez this thing weighs a ton. Now i don't usually do 3 piece but i had to see what these were all about, but, if i'm going to have one it had to have a working tape deck.
I cracked it open last night but peered inside and thought "nah i'll leave that", well with a day off today and nothing else to do i jumped in. I could find no guide for this so I have pieced together a rudimentary guide in case anyone else searches for this.
I'll start by saying the rebelt isn't too bad but care is needed as there are some incredibly thin wires on the side of the deck controlling its complicated mech. Also, a set of dentists tools or other thin device with a hook is helpful. The actual re-belting is like surgery!
I only decided to take some pics halfway through so bear with me.
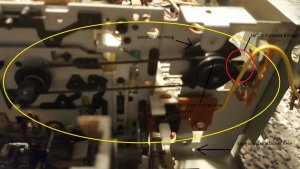
Easy bits first, side off, rear cover off, exposing the inside. I then unscrewed the two screws holding the main board in place, with care this can be moved to one side a little. This is seen on arrow 1.
Pop the deck open and look at the sides to see the door clips, slide the door up to remove, set aside. Undo screws underneath deck to remove front face being careful to unscrew the tape selctor led board, set to one side. (Its out of sight but you can see its ribbon cable in arrow 4. Unscrew black panel inside tape deck to expose underneath, its held on by one small black screw.
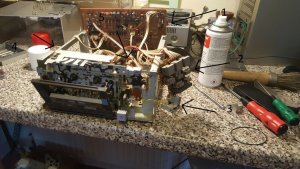
I then removed the two screws holding the board on the back of the motor area, arrow 5. This is just to allow access to the screw holding down the flywheel cover so you can slip the belt over.
Its not shown but you can then remove the top plate over the top of the deck held on by 3 screws.
The board holding the play/fwd/rew keys can be taken off by the two screws, tape counter the same. Tape counter can be moved to one side and play/rew/fwd board draped off to the side. Arrows 2 and 3.
Next remove the screws as shown in red circles, the lower two indicate screws underneath.
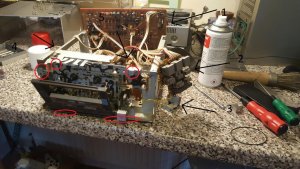
The deck should now move freely. If it does not I may have missed an odd screw so double check. Gently flip the board over and look for the board on the rear of the motor.
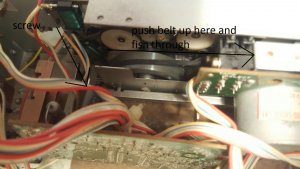
Bottom left corner of this board (as looking at it from rear of deck) you will see a screw holding on the flywheel plate, this can be loosened or removed to slip new flat belt over. Once done you can gently flip the deck over and fish down through with your dentist tool to pull it up through. I cleaned all the deck and relubed while down this end to, plus changed the small belt that end.
Once flipped over looking down though the deck from the motor end you will be able to fish up the flat belt and attach to motor spindle plus attach the other belt from motor to fwd/rew pulley. Just push the small fwd/rew belt over the visible pully and fish it up to the motor the same as you did for the flat belt.
The arrow below shows the approx screw location to loosen flywheel cover and the direction to turn the deck to fish it through.
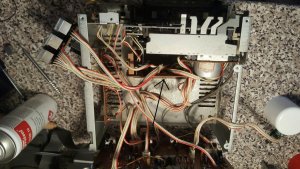
Relocate the lead for tape select LED down the side of the deck and sit deck in usual place to tackle to counter belt. There is a belt here that is important as without it play is pressed but it shuts down immediately, it turns a kind of windmill through a sensor. This operates the auto stop i believe.
Here is the fan/sensor
Attach a new belt from right hand tape spindle to fan assembly, if you have it give the sensor a blast with compressed air, this removed a lot of dust for me. I then reattached play/rew/fwd controls and tape counter and ran a new belt from windmill/fan spindle to counter.
Tested all was well and reassembled. It's a beautiful deck and made even my shitty test tape sound great. I cleaned all rollers, head, demagnetized etc once i was happy with it. I happen to have exactly the right belt so minimal adjustments were needed but they are all documented in the service manual which i recommend getting from Analog Alley. The motor has a proper adjustment point as well as adjusters for the various cams, motor speed, head raise height etc. Dont mess with any of it without the manual.
I just need to re cloth the front of the speakers now, i'll pick up some thin silver tights material and she'll look new.
I hope this helps people in the future and i wasn't too long winded.
Whilst the box was cheap the reconstructive surgery on the hernia and slipped disks lifting it won't be, jeez this thing weighs a ton. Now i don't usually do 3 piece but i had to see what these were all about, but, if i'm going to have one it had to have a working tape deck.
I cracked it open last night but peered inside and thought "nah i'll leave that", well with a day off today and nothing else to do i jumped in. I could find no guide for this so I have pieced together a rudimentary guide in case anyone else searches for this.
I'll start by saying the rebelt isn't too bad but care is needed as there are some incredibly thin wires on the side of the deck controlling its complicated mech. Also, a set of dentists tools or other thin device with a hook is helpful. The actual re-belting is like surgery!
I only decided to take some pics halfway through so bear with me.
Easy bits first, side off, rear cover off, exposing the inside. I then unscrewed the two screws holding the main board in place, with care this can be moved to one side a little. This is seen on arrow 1.
Pop the deck open and look at the sides to see the door clips, slide the door up to remove, set aside. Undo screws underneath deck to remove front face being careful to unscrew the tape selctor led board, set to one side. (Its out of sight but you can see its ribbon cable in arrow 4. Unscrew black panel inside tape deck to expose underneath, its held on by one small black screw.
I then removed the two screws holding the board on the back of the motor area, arrow 5. This is just to allow access to the screw holding down the flywheel cover so you can slip the belt over.
Its not shown but you can then remove the top plate over the top of the deck held on by 3 screws.
The board holding the play/fwd/rew keys can be taken off by the two screws, tape counter the same. Tape counter can be moved to one side and play/rew/fwd board draped off to the side. Arrows 2 and 3.
Next remove the screws as shown in red circles, the lower two indicate screws underneath.
The deck should now move freely. If it does not I may have missed an odd screw so double check. Gently flip the board over and look for the board on the rear of the motor.
Bottom left corner of this board (as looking at it from rear of deck) you will see a screw holding on the flywheel plate, this can be loosened or removed to slip new flat belt over. Once done you can gently flip the deck over and fish down through with your dentist tool to pull it up through. I cleaned all the deck and relubed while down this end to, plus changed the small belt that end.
Once flipped over looking down though the deck from the motor end you will be able to fish up the flat belt and attach to motor spindle plus attach the other belt from motor to fwd/rew pulley. Just push the small fwd/rew belt over the visible pully and fish it up to the motor the same as you did for the flat belt.
The arrow below shows the approx screw location to loosen flywheel cover and the direction to turn the deck to fish it through.
Relocate the lead for tape select LED down the side of the deck and sit deck in usual place to tackle to counter belt. There is a belt here that is important as without it play is pressed but it shuts down immediately, it turns a kind of windmill through a sensor. This operates the auto stop i believe.
Here is the fan/sensor
Attach a new belt from right hand tape spindle to fan assembly, if you have it give the sensor a blast with compressed air, this removed a lot of dust for me. I then reattached play/rew/fwd controls and tape counter and ran a new belt from windmill/fan spindle to counter.
Tested all was well and reassembled. It's a beautiful deck and made even my shitty test tape sound great. I cleaned all rollers, head, demagnetized etc once i was happy with it. I happen to have exactly the right belt so minimal adjustments were needed but they are all documented in the service manual which i recommend getting from Analog Alley. The motor has a proper adjustment point as well as adjusters for the various cams, motor speed, head raise height etc. Dont mess with any of it without the manual.
I just need to re cloth the front of the speakers now, i'll pick up some thin silver tights material and she'll look new.
I hope this helps people in the future and i wasn't too long winded.

")


 Nice work!