Hi all, this is the brief story so far:
I bought a Sharp GF-9000 new in 1983 whilst in Saudi Arabia the kept it in UK until about 10-15 years ago hen I GAVE(!) it away to a young man out of kindness. I'd just about forgotten all about it until a couple of weeks ago when I just happened to see him - considering throwing it away!
My heart sank when I saw it as it looked more like an ancient relic of a barn find - minus the chicken feathers: ariel snapped off and replaced by dangly wirey thing from within it's bowels, a speaker grill looked like it had suffered a hard kick, it was covered in paint splashes with greasy spots and filth of every description on every surface and in every crevice; the cassette door had no cover, a base/treble slider was missing and it appeared to have lost it's soul. Poor thing.
Anyway, in an attempt to cheer me up it was plugged in to check it's sorry state. One speaker didn't work whilst the other cracked loudly whenever the volume slider was moved but at least the radio worked. Cobwebs were removed from the faceless cassette compartment and a cassette inserted. It turned - ish! The sound that came from the speaker was muffle/dull and sounding very....'worried', more like 'a warbling Warbler that warbles in water'!
Feeling somewhat downhearted and thinking the machine was now a lost cause I accepted it back thing there was now nothing to lose by have a poke around to see if there was the remotest chance of salvaging toe poor old thing.
Let me say at this point that I took no photos at this because I didn't see the point. After all, I don't take pictures of my rubbish as I throw it out either! I brought it home, gave the tape head a basic clean, put a tape in and it sounded much better already. That was the point at which I decided to clean it up to see what I would have to deal with to get the machine back in good order. I'd searched the internet for GF-9000, found this forum and became inspired as a consequence despite having no experience in this and never having seen the inside of a radio before!
So.....I gave the outside a good clean, did a more thorough clean of the tape compartment and figured out how to remove the back. I've done my best to straighten out the speaker grill, fabricated a temporary cassette compartment from a CD case (held in with clear tape), made up a simple ariel post to replace the snapped off one (meant as a temporary fix but it's now so firm/rigid it could stay this way for the foreseeable future!)replaced the ariel with one from a Sharp QT250 (perfect fit).
That's a start but it's too much waffle so I'll a few pics tell you more....... and please remember - I'm an absolute beginner!
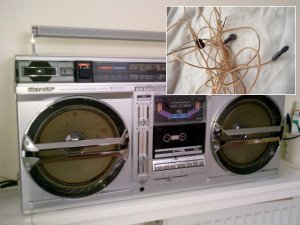
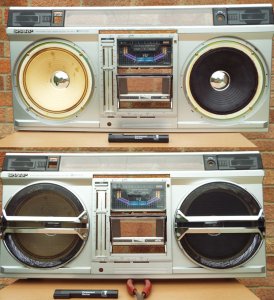
After a first clean, no tape cover yet, greasy L/H speaker, missing base/treble slider, dangly ariel thing removed (insert pic). Already a vast improvement although the picture make it seem better than it actually is at this point!
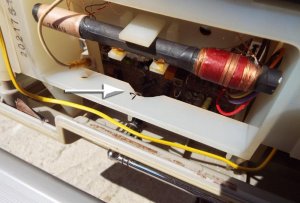
Not being confident enough to remove the machine's innards I notched out a small part of the plastic frame to allow access for a small right-angled screwdriver to attach the ariel to the newly formed post:
Here's the dust cover I made for the cassette compartment door, it's only a temporary fix to keep the dust out for now:
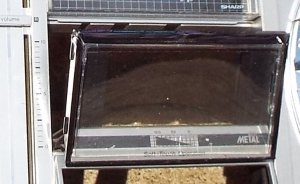
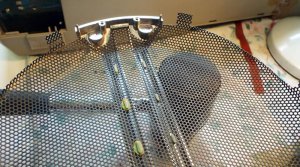
The top edge of the tuning window was a little flexible so I secured this with a very strong clear adhesive tape. The Perspex is in quite good condition although I'll give it a polish at a later date. I used tape on this just in case I ever needed to remove this perspex at a future point, thinking glue would make this a more difficult task.

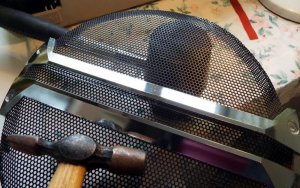
Next job was the speaker grill(s), one of which had 'big lumpy dents' to about a third of the surface. Here I use a rubber mallet under the grill as support whilst I gently hammer the grill as flat as I can with a hammer cushioned with a wad of kitchen towel:
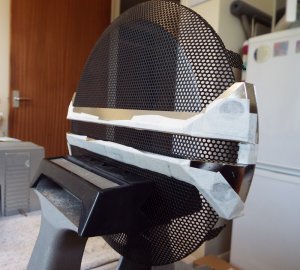
Preparation for spraying:
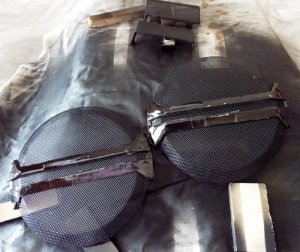
Allowing paint and lacquer to dry:
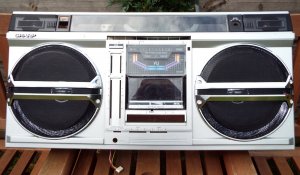
The speakers were stained with some ol' greasy thing or other and I wanted a colour change anyway so decided on black. White was my first preference but I was concerned about the greasy marks showing through. After practising on an egg carton I used a permanent marker pen because a) it's almost weightless, b) it's very easy to control and c) - because I already had one! On the more detailed areas such as the silver centre cone(?) and by securing screws it was merely a case of applying the pen close and allowing the ink to 'bleed' to the required point before lifting the pen away. Progress:

The damaged speaker grill is/was the lower area on the R/H speaker.
Well that's it so far for the most part. There's more to do such as figure out the intricacies of the tuner string origami routine to get that right so any help would be very much appreciated! There's a little more cleaning to do, belts to change (My, Oh My!!!) etc. but I'll get there in the end. To repeat, I am new to all this and a little nervous but it's this forum and it's members that have given me the courage to get this far!
I'll keep you posted as I make progress.
I bought a Sharp GF-9000 new in 1983 whilst in Saudi Arabia the kept it in UK until about 10-15 years ago hen I GAVE(!) it away to a young man out of kindness. I'd just about forgotten all about it until a couple of weeks ago when I just happened to see him - considering throwing it away!
My heart sank when I saw it as it looked more like an ancient relic of a barn find - minus the chicken feathers: ariel snapped off and replaced by dangly wirey thing from within it's bowels, a speaker grill looked like it had suffered a hard kick, it was covered in paint splashes with greasy spots and filth of every description on every surface and in every crevice; the cassette door had no cover, a base/treble slider was missing and it appeared to have lost it's soul. Poor thing.
Anyway, in an attempt to cheer me up it was plugged in to check it's sorry state. One speaker didn't work whilst the other cracked loudly whenever the volume slider was moved but at least the radio worked. Cobwebs were removed from the faceless cassette compartment and a cassette inserted. It turned - ish! The sound that came from the speaker was muffle/dull and sounding very....'worried', more like 'a warbling Warbler that warbles in water'!
Feeling somewhat downhearted and thinking the machine was now a lost cause I accepted it back thing there was now nothing to lose by have a poke around to see if there was the remotest chance of salvaging toe poor old thing.
Let me say at this point that I took no photos at this because I didn't see the point. After all, I don't take pictures of my rubbish as I throw it out either! I brought it home, gave the tape head a basic clean, put a tape in and it sounded much better already. That was the point at which I decided to clean it up to see what I would have to deal with to get the machine back in good order. I'd searched the internet for GF-9000, found this forum and became inspired as a consequence despite having no experience in this and never having seen the inside of a radio before!
So.....I gave the outside a good clean, did a more thorough clean of the tape compartment and figured out how to remove the back. I've done my best to straighten out the speaker grill, fabricated a temporary cassette compartment from a CD case (held in with clear tape), made up a simple ariel post to replace the snapped off one (meant as a temporary fix but it's now so firm/rigid it could stay this way for the foreseeable future!)replaced the ariel with one from a Sharp QT250 (perfect fit).
That's a start but it's too much waffle so I'll a few pics tell you more....... and please remember - I'm an absolute beginner!
After a first clean, no tape cover yet, greasy L/H speaker, missing base/treble slider, dangly ariel thing removed (insert pic). Already a vast improvement although the picture make it seem better than it actually is at this point!
Not being confident enough to remove the machine's innards I notched out a small part of the plastic frame to allow access for a small right-angled screwdriver to attach the ariel to the newly formed post:
Here's the dust cover I made for the cassette compartment door, it's only a temporary fix to keep the dust out for now:
The top edge of the tuning window was a little flexible so I secured this with a very strong clear adhesive tape. The Perspex is in quite good condition although I'll give it a polish at a later date. I used tape on this just in case I ever needed to remove this perspex at a future point, thinking glue would make this a more difficult task.
Next job was the speaker grill(s), one of which had 'big lumpy dents' to about a third of the surface. Here I use a rubber mallet under the grill as support whilst I gently hammer the grill as flat as I can with a hammer cushioned with a wad of kitchen towel:
Preparation for spraying:
Allowing paint and lacquer to dry:
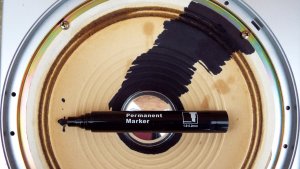
The speakers were stained with some ol' greasy thing or other and I wanted a colour change anyway so decided on black. White was my first preference but I was concerned about the greasy marks showing through. After practising on an egg carton I used a permanent marker pen because a) it's almost weightless, b) it's very easy to control and c) - because I already had one! On the more detailed areas such as the silver centre cone(?) and by securing screws it was merely a case of applying the pen close and allowing the ink to 'bleed' to the required point before lifting the pen away. Progress:
The damaged speaker grill is/was the lower area on the R/H speaker.
Well that's it so far for the most part. There's more to do such as figure out the intricacies of the tuner string origami routine to get that right so any help would be very much appreciated! There's a little more cleaning to do, belts to change (My, Oh My!!!) etc. but I'll get there in the end. To repeat, I am new to all this and a little nervous but it's this forum and it's members that have given me the courage to get this far!
I'll keep you posted as I make progress.
 good thing it didnt hit the dumpster!
")

") Glad you're here with us!
Glad you're here with us!
 from Southern California
  Keep doin what your doin!
 Good work! Love that style box