- Status
- Not open for further replies.
If you have an M90 service manual, you can follow the instructions & diagrams to remove the chassis. That is how I learned to take mine apart.
Mark, this is from memory:
(1) Remove back case. Remove 3 short screws from case back on top edge (left, right, center). Then remove 7 long screws. Might be one inside battery compartment.
(2) Carefully separate back case (do not yank) and disconnect the FM antenna leads which connect to the tuner board and the power connector which connects behind power switch.
(3) Remove 2 screws from top side below handle.
(4) Remove 2 screws from bottom of boombox.
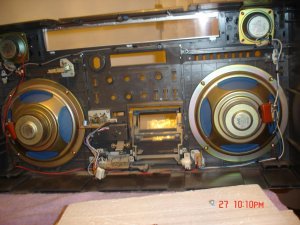
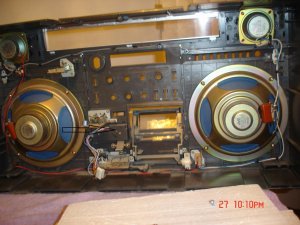
(5) Disconnect wire looms connectors: 2 (3 including power cable) behind the power switch. 1 at the AMSS board, 3 at the remote/jack board, and 1 at the headphone jack board. There is one connector that goes from deck buttons to the left side (viewed from backside) of deck. Disconnect at the deck.
(6) Remove approximately 8 blue colored screws at chassis perimeter. Not the purple ones, just the blue ones. There are two that are hard to find. One on the right side, and another on the left side of the cassette deck.
(7) Eject cassette door and leave open.
(8) Chassis should be loose. You can test separate and if loose, you will know. If it feels like it's still screwed on someplace, it probably is so keep looking for the blue screws. Also, if loose but it somehow feels tethered still, you probably forgot to disconnect one of the wire harnesses. Handle stays with chassis which might make it easier to lift chassis out
When reassembling, be very careful to ONLY reconnect power supply cable behind the power switch. More than 1 person has fried their power supply when they accidently reconnected that cable to the wrong spot which will short the PS. Most of the other cables can only go in 1 location or intuitive enough, but the PS cable is apparently easy to swap with another one. I know because I've been asked to rebuild these PS's before due to exactly this reason.
Hope this helps.
Norm.
(1) Remove back case. Remove 3 short screws from case back on top edge (left, right, center). Then remove 7 long screws. Might be one inside battery compartment.
(2) Carefully separate back case (do not yank) and disconnect the FM antenna leads which connect to the tuner board and the power connector which connects behind power switch.
(3) Remove 2 screws from top side below handle.
(4) Remove 2 screws from bottom of boombox.
(5) Disconnect wire looms connectors: 2 (3 including power cable) behind the power switch. 1 at the AMSS board, 3 at the remote/jack board, and 1 at the headphone jack board. There is one connector that goes from deck buttons to the left side (viewed from backside) of deck. Disconnect at the deck.
(6) Remove approximately 8 blue colored screws at chassis perimeter. Not the purple ones, just the blue ones. There are two that are hard to find. One on the right side, and another on the left side of the cassette deck.
(7) Eject cassette door and leave open.
(8) Chassis should be loose. You can test separate and if loose, you will know. If it feels like it's still screwed on someplace, it probably is so keep looking for the blue screws. Also, if loose but it somehow feels tethered still, you probably forgot to disconnect one of the wire harnesses. Handle stays with chassis which might make it easier to lift chassis out
When reassembling, be very careful to ONLY reconnect power supply cable behind the power switch. More than 1 person has fried their power supply when they accidently reconnected that cable to the wrong spot which will short the PS. Most of the other cables can only go in 1 location or intuitive enough, but the PS cable is apparently easy to swap with another one. I know because I've been asked to rebuild these PS's before due to exactly this reason.
Hope this helps.
Norm.
Super has it down cold.....1 tip to not confuse the connectors is to take a number of different colored sharpies or markers & mark each connection with a different color so it's easy to re-connect everything without the guess work....
Cheers,
Cpl
Cheers,
Cpl
Yep, that always works for me. On any deviceCpl-Chronic said:Super has it down cold.....1 tip to not confuse the connectors is to take a number of different colored sharpies or markers & mark each connection with a different color so it's easy to re-connect everything without the guess work....
Cheers,
Cpl
 (haven't yet had the pleasure with an M90). Also, if you take some photies at every stage, showing where the cables all run, then you can refer to these when you reassemble. [The photies] don't need to be massive, VGA (0.3Mp) is adequate as you only need to take a small area at any one time, but they'll make life a whole load simpler. This must be the reason how manufacturers of phones started supplying them with the camera built in.

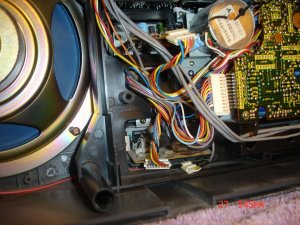
The hard to find screw Norm was talking about goes on the post left to the cassette door in the picture. It is hidden way inside.
Attachments
-
 112.9 KB Views: 55
 -
 82.9 KB Views: 55
 -
 83 KB Views: 53

- Status
- Not open for further replies.