Fixing a legend.....

blu_fuz

Moderator
Staff member
Jun 3, 2009
10,668
159
63
40
WI
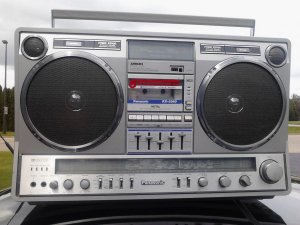
I bought this Panasonic RX-5350 knowing there was some kind of issues with it, but didn't know exactly what. After getting it here, overall the condition is good. Needs a cleaning/detail and is missing the battery door.


The problem is after testing it out, the capacitors might be dried up causing 'motorboating' which is a term used to describe the sound that comes from electronics with bad components.

After de-oxing the knobs and switches, this is what I have to start with.
[youtube]http://youtu.be/9JJewdvvyOo[/youtube]


As you can see, I do get sound even from L/R with the Ipod, which is a good sign that the amps are OK. The cassette does play/ff/rw/rec/etc. from what I can tell including the tape counter. All the parts move and are belted at least.


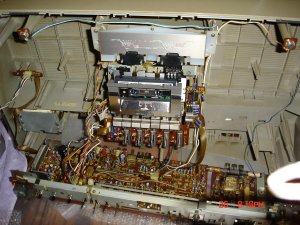
This thread is to document the work involved to re-cap a monster like this, maybe a little troubleshooting, and some tips/tricks. Hopefully there is a happy ending! :D


If there truely are 130+ capacitors in this, 2 minutes to replace each (kind of slow, but figuring worst case) best case scenario working on it straight through, no breaks, and saying I have all the correct replacement caps sitting here, could easily take me 4.5 hours!!!!


Worth it? Hell yeah ;)


Here is my paperweight today:

0920131307.jpg
 

blu_fuz

Moderator
Staff member
Jun 3, 2009
10,668
159
63
40
WI
I hear ya Chris :lol:. As long as I take my time, label caps and note the direction of polarity, it shouldn't be too bad. I promise to take care of it!

I just finished the stereo install in my truck so now I can setup a station in the garage to start working on the 5350. I'm actually excited to see what I can fix.

Obviously I will start looking for something easy to fix first. If nothing is obvious then I will go into full fix mode and get my capacitors ordered.
 

BoomboxLover48

Member (SA)
Dec 3, 2010
5,747
262
83
Chicago, IL
Be patient! Don't do any calculations like 2 minute per capacitor.
Trust me! I've done full recap on 5 or more units and it takes much much much longer time.
Going back and forth looking for the right leads is more time consuming and also the "solder sucking" job to make the holes clean.

Good Luck Joe! :-)

Like Ira said you will now have a great unit when it is all done right! :-D
 

blu_fuz

Moderator
Staff member
Jun 3, 2009
10,668
159
63
40
WI
BoomboxLover48 said:
Be patient! Don't do any calculations like 2 minute per capacitor.
Trust me!
Oh don't worry, I won't be rushing through this to hit any kind of record, or to do any certain amount of caps per minute. This will be a pretty slow drawn out repair. I bet I might only do 10 caps in one sitting before I get interrupted with "real life" :lol:.

That's another reason I have to setup in the garage because it won't be a weekend warrior project.
 

k2j

Member (SA)
Mar 28, 2011
1,246
2
0
West Coast
Nice one Joe. I used to dislike the looks of that model, but now I'm dying for one. Of course I passed one up locally years ago for pennies. Ooof dah!

Enjoy the recapping!
 

blu_fuz

Moderator
Staff member
Jun 3, 2009
10,668
159
63
40
WI
Finally opened it up tonight. Found some dry solder joints and some green corrosion on a few electronic components. No blown or bulged caps that I could find......

0103142107.jpg
 

Superduper

Member (SA)
Electrolytic caps blow when over voltage (or reversed) and bulge when overheated or over voltage. However on older electronics, the issue is primarily dried out electrolyte within the caps which probably won't show any external physical signs. In other words, while blown or bulging caps is a good indicator that the component has failed, the lack of physical abnormalities should not be taken to mean that the opposite is necessarily true.
 

=ml=

Member (SA)
Jan 10, 2011
686
2
0
E-Rock (Eagle Rock, L.A.)
blu_fuz said:
Finally opened it up tonight. Found some dry solder joints and some green corrosion on a few electronic components. No blown or bulged caps that I could find......

0103142107.jpg
Nice, a date stamp! :yes:

* 8 (1-12) month
* 2 (0-9; 1980-1989) year
* 2 (0-3) first day digit
* 4 (0-9) second day digit
* ? (1-3) work shift

So this part was molded on August 24, 1982. :-)

Do you mind if I add it to http://www.pinterest.com/boomboxcreators/date-stamps/?

Good luck with resto!

Go!

=ml=
 

Ken

Member (SA)
Aug 30, 2009
2,327
2
0
63
Bremerton, WA, USA
Good luck, Joe. Like Ira said, just imagine your pride 'n joy all finished and sounding sweet.

Oh, and remember: The bigger the blob, the better the job. Now, let the soldering begin!
 

blu_fuz

Moderator
Staff member
Jun 3, 2009
10,668
159
63
40
WI
ML, yeah buddy you can add it to the registry of date stamps. It was a '2nd' shift built box.

Norm, for sure about the dried up caps. I was searching for anything obvious that could be the culpret. I'm going to take inventory on the caps so I can get new ones ordered.

I was suprised at how easy it is to get to the main board, quick connectors, and plenty of room inside the 5350. I'm excited to get working on it ;).

Thanks Kenpat, I hope I can get it singing again.

Ps, there were 4 pins on the function switch that had only a partial blob of solder. 1 of the pins I was able to see it was wiggling free of the solder. Not sure why, maybe someone was in this box before...... who knows.
 

BoomboxLover48

Member (SA)
Dec 3, 2010
5,747
262
83
Chicago, IL
I agree there is lots of room to work on and easy to remove the boards but replacing any of those pots is so hard to work on.
Tuning chord is on the front plate where the pots mounted. Without removing the tuning chord it seemed practically impossible to work on them.

Good Luck Joe!
 

Attachments