If you're like me you have a fetish for big chrome dustcaps on your woofers. Anyone who's been into replacing speakers with modern ones will soon find out that 99% of them don't have chrome or metallic dustcaps, instead going for boring black or another flat colour. So for the last few weeks I've been wracking my brains for a simple solution to this problem as with my latest custom I really wanted big chrome dustcaps on the speakers I replaced the super woofers with.
After weeks of searching online and looking for a possible way to fabricate something a true epiphany occurred, and from this point on, none of us out there lusting for shiny metallic dustcaps on their speakers shall want no more!!
How I hear you ask? Well, like most good ideas it's pretty simple. In my quest to find the right convex metal shape I realised the bottom of every single metal spray can has the right shape with just the right diameter. To turn them into dustcaps is a 10 minute process.
I emptied a couple of spray cans completely so there was no pressure in the cans, you can tell when there is no pressure as you can push the sides in easily. Choosing the right spray can is a good idea, I used spray paint for this project, but spray lubricants or cleaners would be even easier. Also, the smaller the can the smaller the dustcap, of course, so electrical cleaner cans, that we've probably all got a few empties lying around, will make for perfect candidates if full sized cans are too big.
Next puncture the can to ensure there is no pressure. And then use a rotary tool disc cutter to run around the edge just on the inside of the bottom lip. The metal is thin and this is only going to take a minute or so to go around. Once you go full circle the base should just fall off and your dustcap is nearly done!
Now it's just a matter of cleaning up and polishing the metal. I spent more time removing the paint from the surface than any other part of the procedure, this is highly dependant on what was in the can previously. The metal inside on the ones I used is highly reflective, but it's not a complete mirror finish. This could easily be done by using a metal polisher on the surface and then sealing it with some varnish if you're so inclined.
Once you're happy with the finish you just need to glue them in place. I'm yet to glue mine in, they're just sitting on the speakers in the photos, but using any speaker or super glue will get them on nice and solid. One of the best things about using these for dustcaps is the strength of the metal, no one's going to be poking these in in a hurry, thats for sure. They add very little weight to speakers and I highly doubt they'll effect the sound of the speakers, but I'll report back on that once they're on.
Heres some pictures of the initial ones I've made!
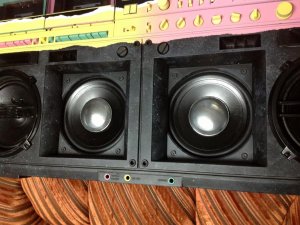
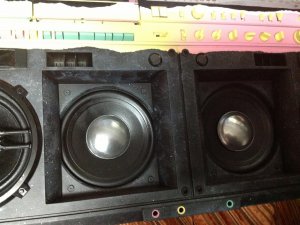
I can't wait to experiment with some other types of spray cans to see what other ones will work for different types of speakers but as you can see they're pretty convincing.
Rock On.
After weeks of searching online and looking for a possible way to fabricate something a true epiphany occurred, and from this point on, none of us out there lusting for shiny metallic dustcaps on their speakers shall want no more!!
How I hear you ask? Well, like most good ideas it's pretty simple. In my quest to find the right convex metal shape I realised the bottom of every single metal spray can has the right shape with just the right diameter. To turn them into dustcaps is a 10 minute process.
I emptied a couple of spray cans completely so there was no pressure in the cans, you can tell when there is no pressure as you can push the sides in easily. Choosing the right spray can is a good idea, I used spray paint for this project, but spray lubricants or cleaners would be even easier. Also, the smaller the can the smaller the dustcap, of course, so electrical cleaner cans, that we've probably all got a few empties lying around, will make for perfect candidates if full sized cans are too big.
Next puncture the can to ensure there is no pressure. And then use a rotary tool disc cutter to run around the edge just on the inside of the bottom lip. The metal is thin and this is only going to take a minute or so to go around. Once you go full circle the base should just fall off and your dustcap is nearly done!
Now it's just a matter of cleaning up and polishing the metal. I spent more time removing the paint from the surface than any other part of the procedure, this is highly dependant on what was in the can previously. The metal inside on the ones I used is highly reflective, but it's not a complete mirror finish. This could easily be done by using a metal polisher on the surface and then sealing it with some varnish if you're so inclined.
Once you're happy with the finish you just need to glue them in place. I'm yet to glue mine in, they're just sitting on the speakers in the photos, but using any speaker or super glue will get them on nice and solid. One of the best things about using these for dustcaps is the strength of the metal, no one's going to be poking these in in a hurry, thats for sure. They add very little weight to speakers and I highly doubt they'll effect the sound of the speakers, but I'll report back on that once they're on.
Heres some pictures of the initial ones I've made!
I can't wait to experiment with some other types of spray cans to see what other ones will work for different types of speakers but as you can see they're pretty convincing.
Rock On.


")
")

")

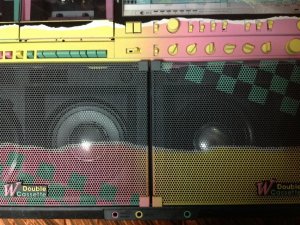
 I can't wait to see the new "80's color scheme" on the very "grail-ish looking" box you're working on.